Week 9: Networking
Table of contents
This week we wanted to recreate laser-tag using laser-pointers and photo-receivers. This didn’t work too well, so we ended up using infrared (IR) LED’s and IR photo-transistors instead.
I worked with Isaac and David on this project, and we split up the work into multiple parts:
- Web-app
- Electronic circuit
- Sensors
- Physical design
In my documentation I will focus on the parts that I understand the most: the web-app, setting up firebase, and the sensor.
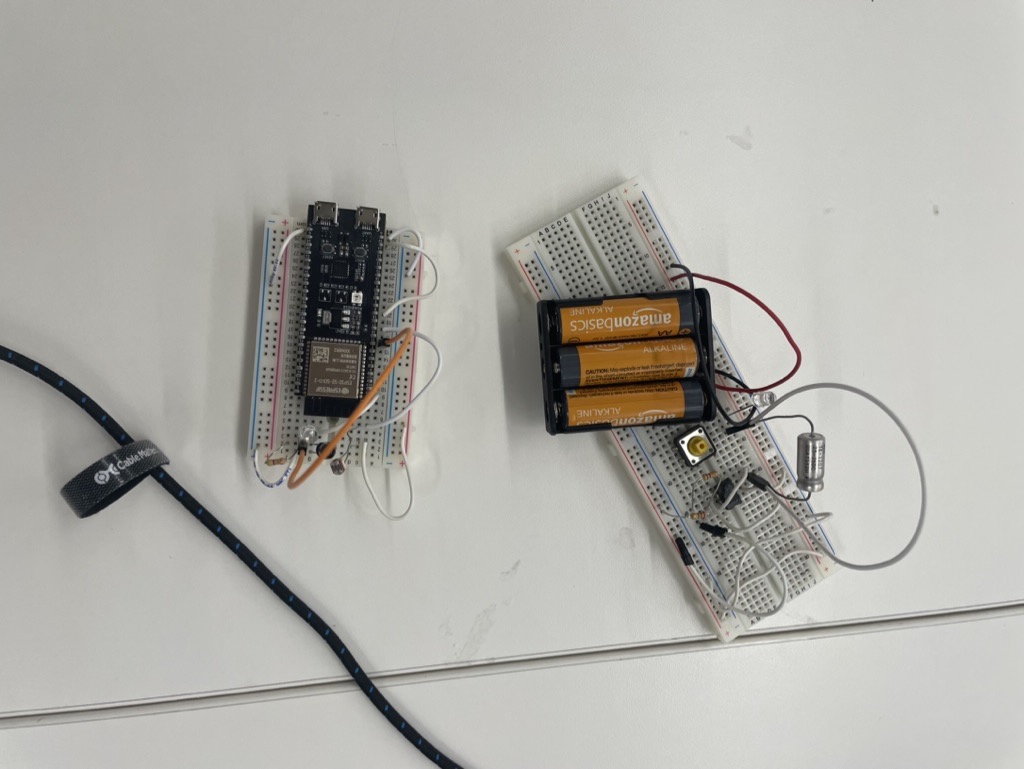
Electronic circuit
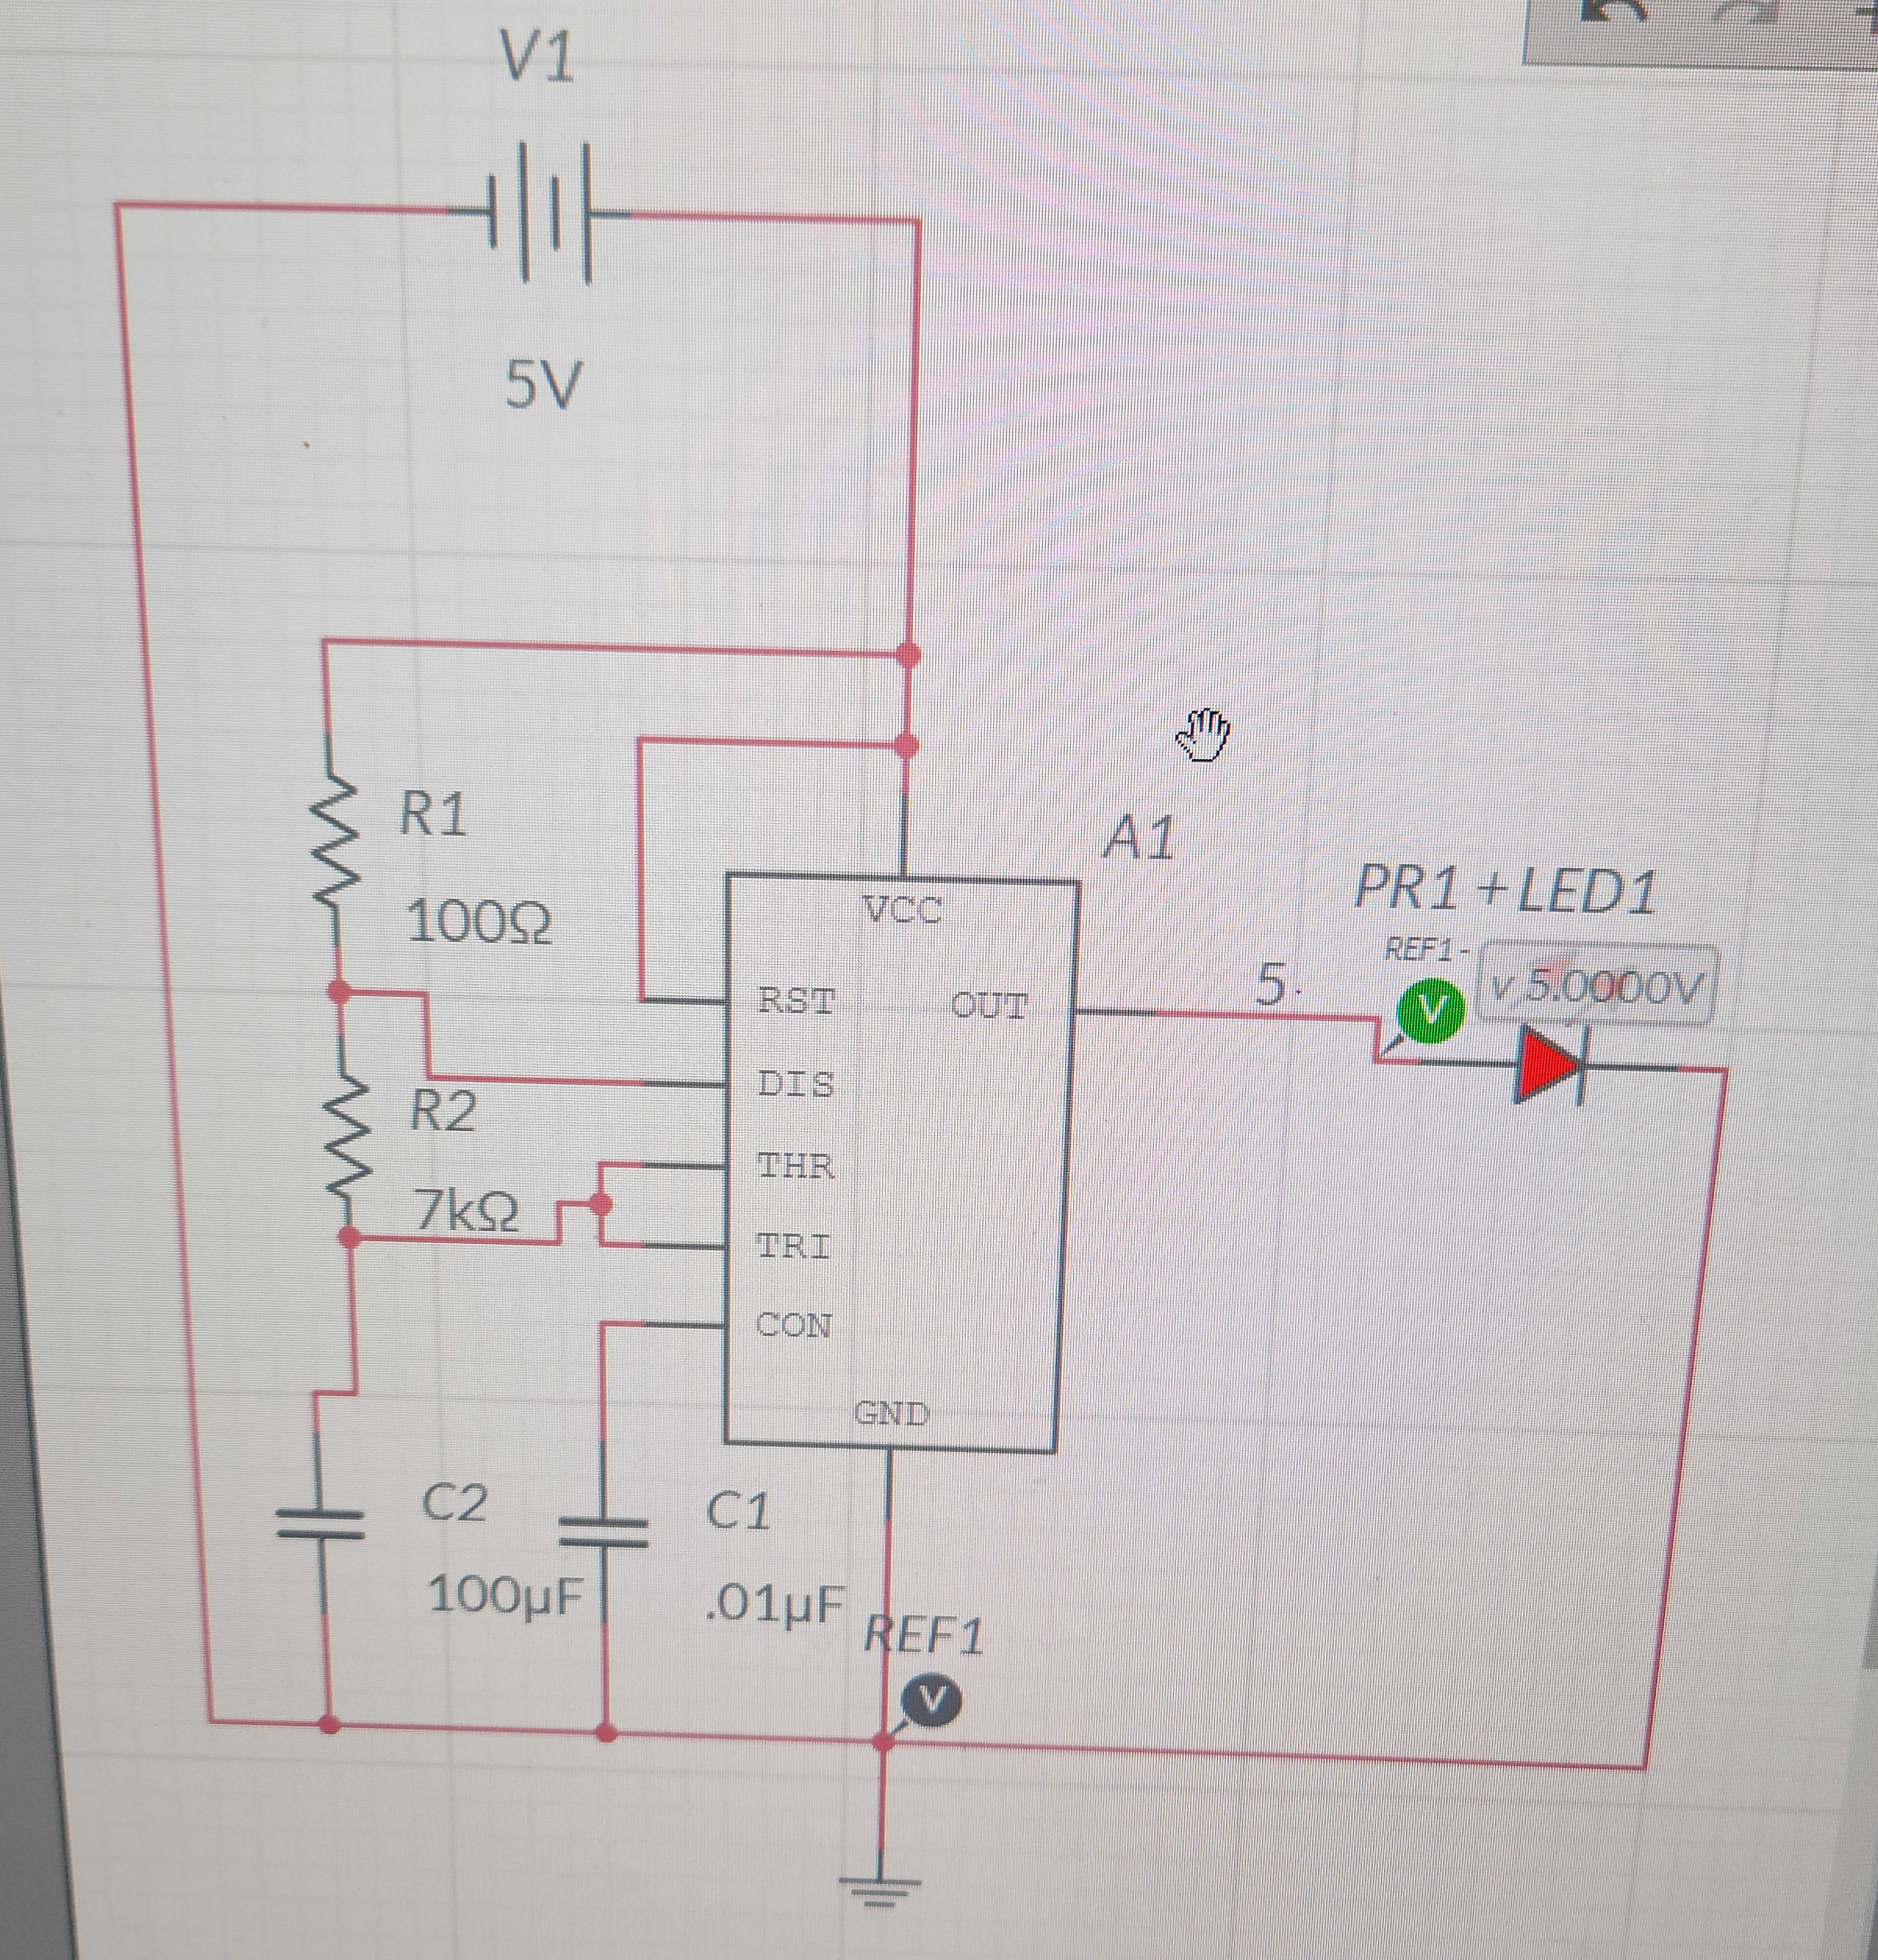
For the laser shooter, we build a simple circuit using a button and a 555 circuit. The 555 circuit is used to generate a square wave, which is then used to drive the IR LED. The main purpose of this is to prohibit the user to have the laser-shooter on all the time. Instead, the 555 circuit creates pulses, so it makes it a little more difficult to hit the target.
The button is used to trigger the 555 circuit, which then turns on the IR LED for a short period of time. This is connected to a battery pack, so the shooter is completely wireless.
Sensors
The sensor is the only part of the system that needs a micro-controller. It uses a photo-transistor, wired up in a voltage divider circuit and the output is connected to an analog pin on the micro-controller. The micro-controller then reads the voltage and determines if the laser has hit the target.
Networking
When the sensor reads a voltage that crosses a certain threshold, it reads player’s score (the amount of times he’s been hit by the IR LED) and increments it by one. It then sends the new score to a real-time database on firebase.
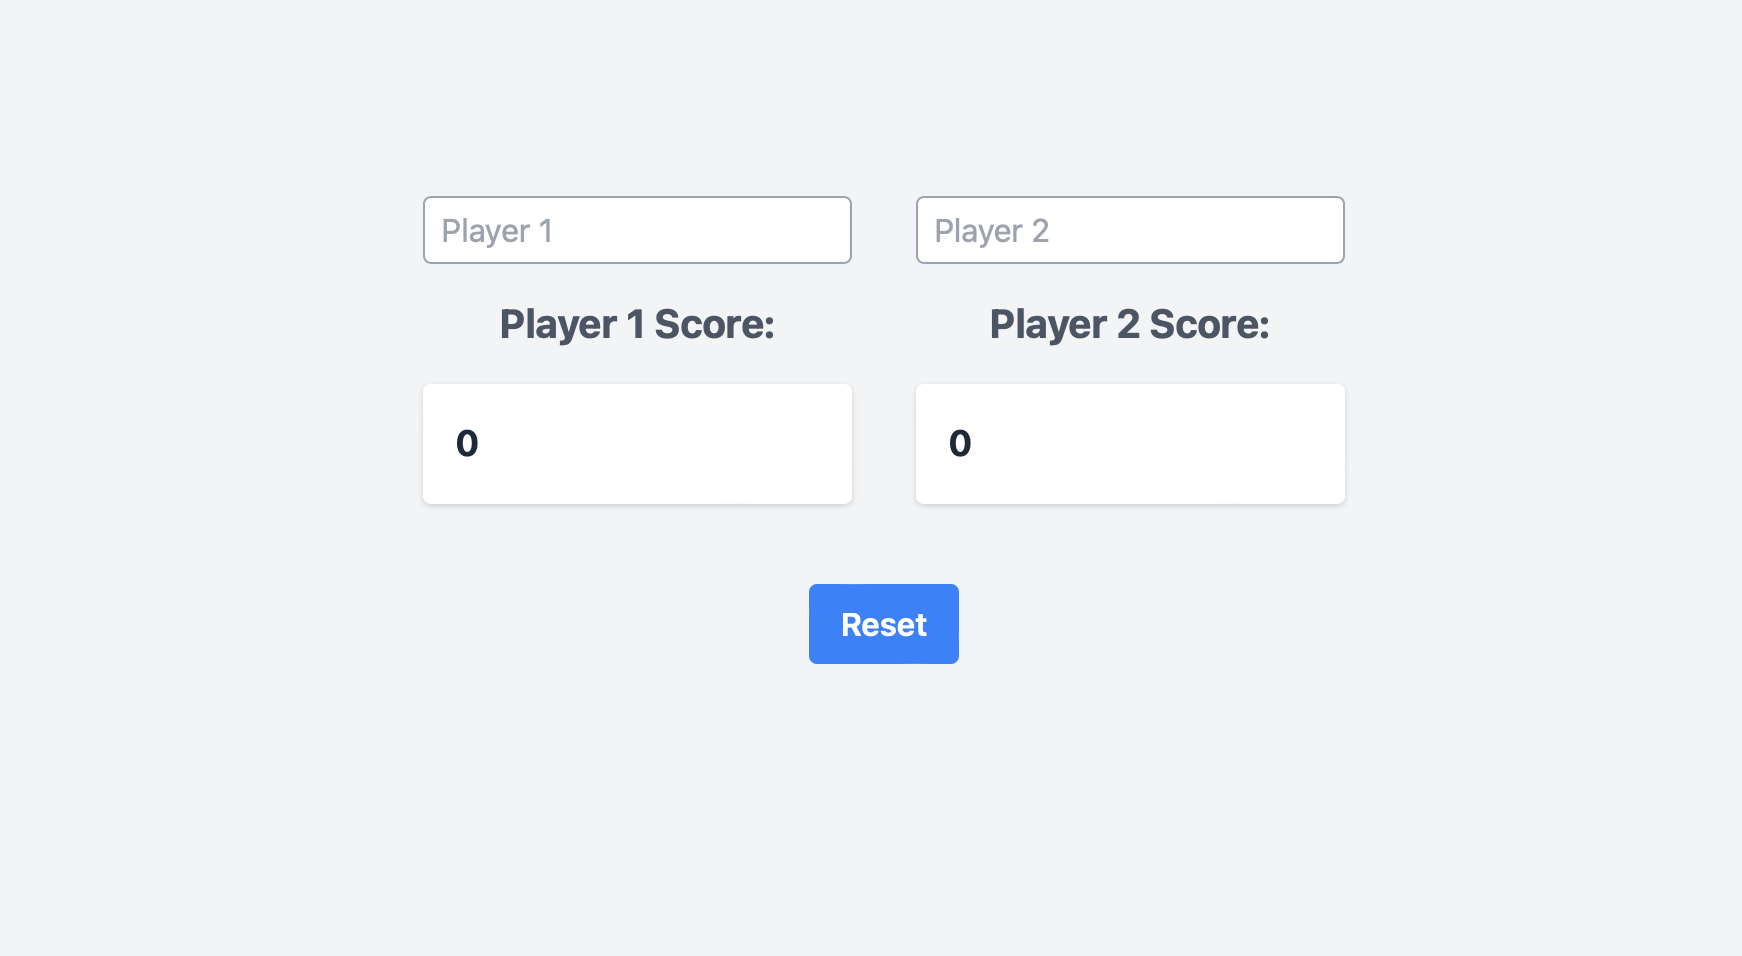
Web-app
A simple web-app is coded up, which displays the real-time score from Firebase between two players. Players can choose their names, and the web-app will display the score of each player. There is also a reset button which zero’s out the scores of the two players, so they can restart the game.
Physical design
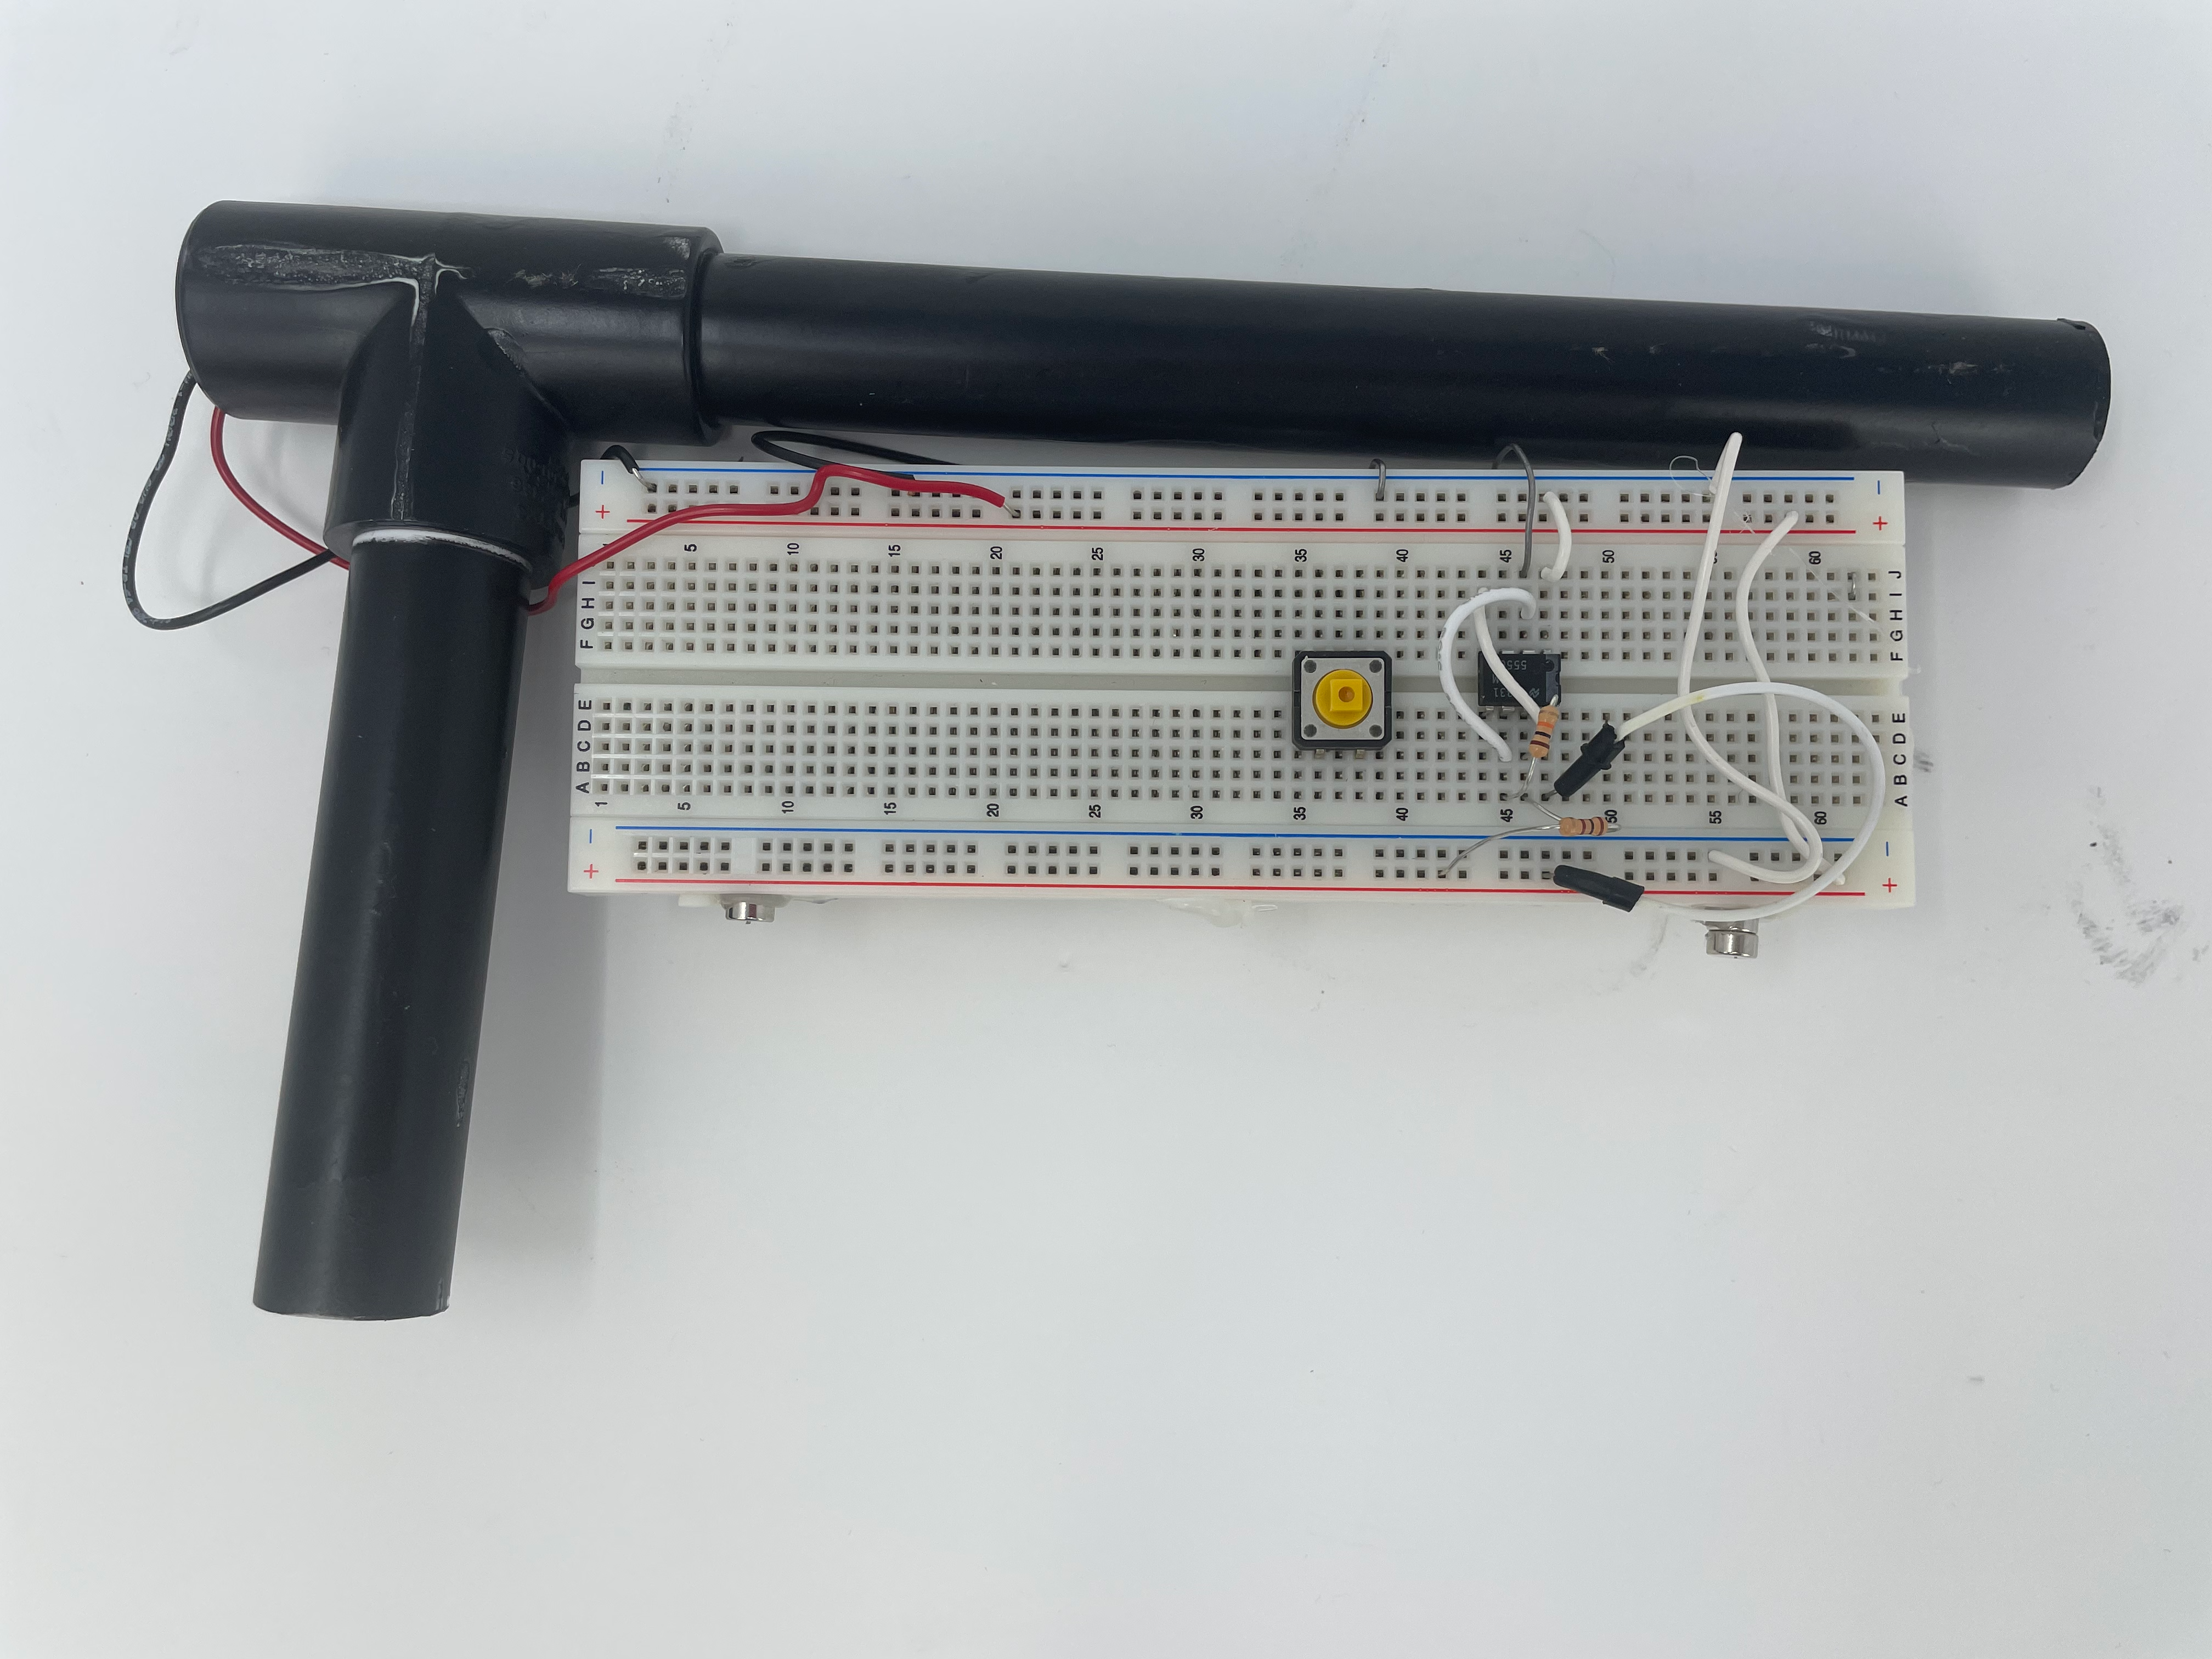
For the physical gun, we decided to use PVC tubes, with the infrared LED placed inside the tube. This helped to narrow the IR beam and made it more ‘gun-like’ rather than ‘remote-like’. A picture of the prototype gun is shown below.
Demo
A prototype demo is shown in the video below:
The code got all the components is given below.
Web app code
<!DOCTYPE html>
<html lang="en">

<head>
    <meta charset="UTF-8">
    <meta http-equiv="X-UA-Compatible" content="IE=edge">
    <meta name="viewport" content="width=device-width, initial-scale=1.0">
    <title>Firebase Real-time Database Example</title>

    <!-- Add Tailwind CSS stylesheet -->
    <link href="https://cdn.jsdelivr.net/npm/tailwindcss@2.2.16/dist/tailwind.min.css" rel="stylesheet">
</head>

<body class="h-screen bg-gray-100">
    <div class="h-full flex items-center justify-center flex-col space-y-4">
        <div class="flex space-x-8">

            <!-- Player 1 container -->
            <div class="space-y-4">
                <input id="player1Name" class="px-2 py-1 border border-gray-400 rounded" type="text" placeholder="Player 1">
                <div id="player1Label" class="text-center text-xl font-bold text-gray-600">Player 1 Score:</div>
                <div id="player1Score" class="p-4 bg-white rounded shadow text-lg font-bold text-gray-800">
                    0
                </div>
            </div>

            <!-- Player 2 container -->
            <div class="space-y-4">
                <input id="player2Name" class="px-2 py-1 border border-gray-400 rounded" type="text" placeholder="Player 2">
                <div id="player2Label" class="text-center text-xl font-bold text-gray-600">Player 2 Score:</div>
                <div id="player2Score" class="p-4 bg-white rounded shadow text-lg font-bold text-gray-800">
                    0
                </div>
            </div>

        </div>
        <div class="flex justify-center w-full">
            <button id="resetButton" class="mt-6 px-4 py-2 bg-blue-500 text-white font-semibold rounded">Reset</button>
        </div>
    </div>


    <script>
        document.getElementById('player1Name').addEventListener('input', (event) => {
            const playerName = event.target.value || 'Player 1';
            document.getElementById('player1Label').innerHTML = `${playerName} Score:`;
        });

        document.getElementById('player2Name').addEventListener('input', (event) => {
            const playerName = event.target.value || 'Player 2';
            document.getElementById('player2Label').innerHTML = `${playerName} Score:`;
        });
    </script>
    <!-- Add Firebase SDK -->
    <script src="https://www.gstatic.com/firebasejs/8.10.0/firebase-app.js"></script>
    <script src="https://www.gstatic.com/firebasejs/8.10.0/firebase-database.js"></script>

    <!-- Include your custom JavaScript -->
    <script>
        {{/*  import { initializeApp } from "https://www.gstatic.com/firebasejs/9.19.1/firebase-app.js";  */}}
        // TODO: Add SDKs for Firebase products that you want to use
        // https://firebase.google.com/docs/web/setup#available-libraries

        // Your web app's Firebase configuration
        const firebaseConfig = {
            apiKey: "AIzaSyBYL8_Gd4GS-40AcqkTFud8awn-mhHOFHM",
            authDomain: "ps70-lasertag.firebaseapp.com",
            databaseURL: "https://ps70-lasertag-default-rtdb.firebaseio.com",
            projectId: "ps70-lasertag",
            storageBucket: "ps70-lasertag.appspot.com",
            messagingSenderId: "966598957714",
            appId: "1:966598957714:web:2568a00f512c3ed6b3e44b"
        };
        // Initialize Firebase
        firebase.initializeApp(firebaseConfig);

        // Create references to the realtime database
        const player1Ref = firebase.database().ref('/player1/score');
        const player2Ref = firebase.database().ref('/player2/score');

        // Fetch scores from the realtime database and display them
        function updateScore(playerRef, elementId) {
            playerRef.on('value', (snapshot) => {
                const score = snapshot.val();
                document.getElementById(elementId).innerHTML = score;
            });
        }

        // Update scores on the page as their data change
        updateScore(player1Ref, 'player1Score');
        updateScore(player2Ref, 'player2Score');

        function resetScores() {
                player1Ref.set(0);
                player2Ref.set(0);
            }

        document.getElementById('resetButton').addEventListener('click', resetScores);

    </script>

</body>

</html>
Arduino code
#include <Arduino.h>
#if defined(ESP32)
  #include <WiFi.h>
#elif defined(ESP8266)
  #include <ESP8266WiFi.h>
#endif
#include <Firebase_ESP_Client.h>

//Provide the token generation process info.
#include "addons/TokenHelper.h"
//Provide the RTDB payload printing info and other helper functions.
#include "addons/RTDBHelper.h"

// Insert your network credentials
#define WIFI_SSID "MAKERSPACE"
#define WIFI_PASSWORD "12345678"

// Insert Firebase project API Key
#define API_KEY "AIzaSyBYL8_Gd4GS-40AcqkTFud8awn-mhHOFHM"

// Insert RTDB URLefine the RTDB URL */
#define DATABASE_URL "https://ps70-lasertag-default-rtdb.firebaseio.com"

//Define Firebase Data object
FirebaseData fbdo;

FirebaseAuth auth;
FirebaseConfig config;

unsigned long sendDataPrevMillis = 0;
int count = 0;
bool signupOK = false;
int SENSOR_PIN = 15;

class AnalogSensor {
  private:
    int _pin; // Pin for the analog sensor
    int _minValue; // Minimum possible value from the sensor
    int _maxValue; // Maximum possible value from the sensor

  public:
    // Constructor
    AnalogSensor(int pin, int minValue = 0, int maxValue = 4096) {
      _pin = pin;
      _minValue = minValue;
      _maxValue = maxValue;
      pinMode(_pin, INPUT);
    }

    // Read raw value from the sensor
    int readRawValue() {
      return analogRead(_pin);
    }

    // Read normalized value from the sensor (0 to 100)
    int readNormalizedValue() {
      int rawValue = readRawValue();
      int normalizedValue = map(rawValue, _minValue, _maxValue, 0, 100);
      return normalizedValue;
    }
};


void setup(){
  Serial.begin(115200);
  WiFi.begin(WIFI_SSID, WIFI_PASSWORD);
  Serial.print("Connecting to Wi-Fi");
  while (WiFi.status() != WL_CONNECTED){
    Serial.print(".");
    delay(300);
  }
  Serial.println();
  Serial.print("Connected with IP: ");
  Serial.println(WiFi.localIP());
  Serial.println();

  /* Assign the api key (required) */
  config.api_key = API_KEY;

  /* Assign the RTDB URL (required) */
  config.database_url = DATABASE_URL;

  /* Sign up */
  if (Firebase.signUp(&config, &auth, "", "")){
    Serial.println("ok");
    signupOK = true;
  }
  else{
    Serial.printf("%s\n", config.signer.signupError.message.c_str());
  }

  /* Assign the callback function for the long running token generation task */
  config.token_status_callback = tokenStatusCallback; //see addons/TokenHelper.h

  Firebase.begin(&config, &auth);
  Firebase.reconnectWiFi(true);
  pinMode(42, OUTPUT);
}

int score;

void loop(){
  if (Firebase.ready() && signupOK && (millis() - sendDataPrevMillis > 15 || sendDataPrevMillis == 0)){
    sendDataPrevMillis = millis();

  AnalogSensor photoresistor(SENSOR_PIN);
  int normalizedValue = photoresistor.readNormalizedValue();
  Serial.println(normalizedValue);

  if(normalizedValue < 60){
    Firebase.RTDB.getFloat(&fbdo, "/player1/score");
    score = fbdo.floatData();
    Firebase.RTDB.setInt(&fbdo, "player1/score", score + 1);
    }

  }
}