Week 4: Microcontroller programming
Table of contents
This week I created the first iteration of my automatic plant watering system using a moisture sensor, water pump and OLED display. There were three main components to this project:
- Connecting the components to the microcontroller
- Calibrating the moisture sensor
- Make other components do stuff based on moisture sensor data
List of components
- ESP32-S2 DevKitC
- Push button
- 10k resistor
- Breadboard
- Wires
- 5V water pump
- L9110 motor driver
- LED
- Capacitive Soil Moisture Sensor
- 128x64px OLED display (I2C)
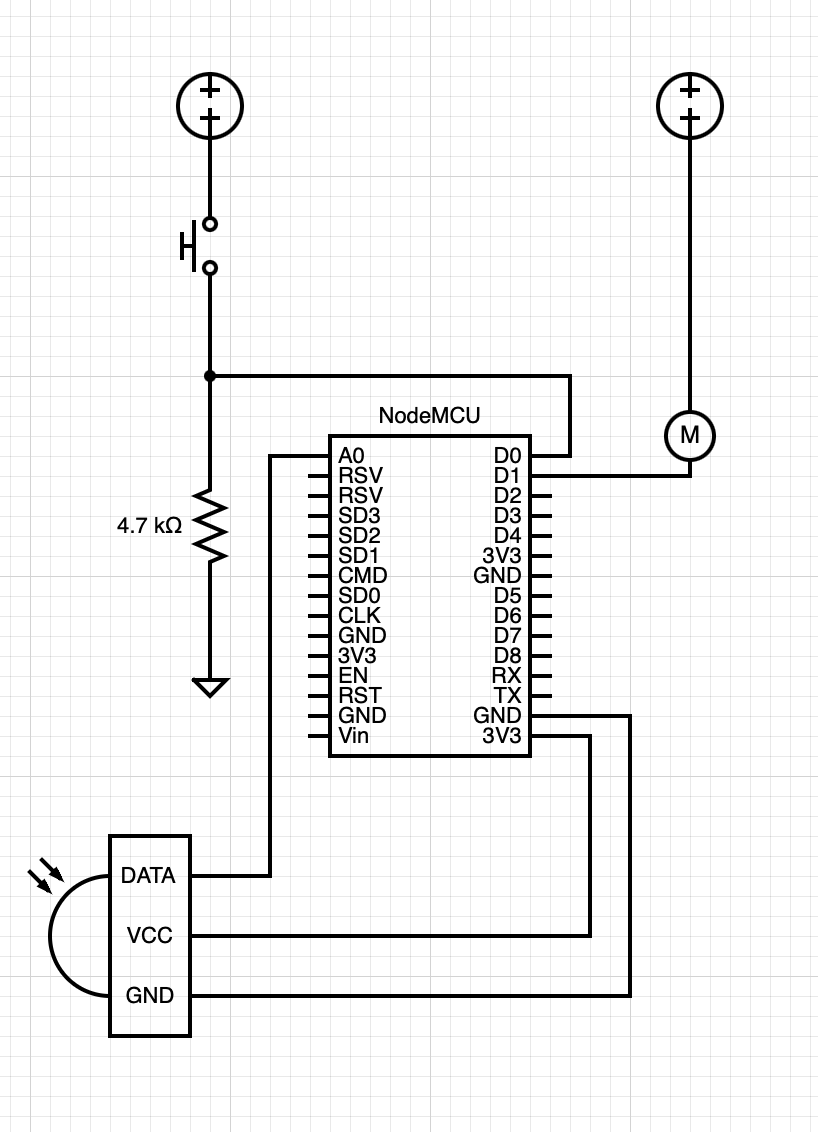
Connecting the components
The push button was attached using a pulldown resistor using the instructions found here . An LED was connected to pin 13, used to visually confirm button presses. This can be left out and logs or print statements used instead.
The capacitative soil moisture sensor was connected to the ESP32-S2 by connecting the VCC pin to 3.3V, the GND pin to GND, and the SIG pin to pin 17 (analog input).
The L9110 motor driver board was connected by connecting VCC to 5V, GND to GND, and the SIG pin to 33. The L9110 connects to the water pump using the A1A and A1B outputs.
The L9110 was connected by connecting the VCC pin to 5V, the GND pin to GND, and the A1A pin to pin 41 and the A1B pin to pin 40, then the water pump was connected to the green terminals on the L9110.
The OLED display is somewhat trickier to connect since it requires finding the right I2C GPIO pins which is device dependent. For the ESP32-S2-DevKitC by Espressif Systems, the default SDA and SCL ports are GPIO8 and GPIO9. The display was connected by connecting the VCC pin to 3.3V, the GND pin to GND, the SDA pin to GPIO8, and the SCL pin to GPIO9. For default ESP32 systems, the usual SDA and SCL pins are GPIO21 and GPIO22 respectively.
To check whether or not the OLED display is connected to the right GPIO ports, the following code can be used.
Code for I2C Checker
/*********
  Rui Santos
  Complete project details at https://randomnerdtutorials.com
*********/

#include <Wire.h>

void setup() {
  Wire.begin(8, 9);
  Serial.begin(115200);
  Serial.println("\nI2C Scanner");
}

void loop() {
  byte error, address;
  int nDevices;
  Serial.println("Scanning...");
  nDevices = 0;
  for(address = 1; address < 127; address++ ) {
    Wire.beginTransmission(address);
    error = Wire.endTransmission();
    if (error == 0) {
      Serial.print("I2C device found at address 0x");
      if (address<16) {
        Serial.print("0");
      }
      Serial.println(address,HEX);
      nDevices++;
    }
    else if (error==4) {
      Serial.print("Unknow error at address 0x");
      if (address<16) {
        Serial.print("0");
      }
      Serial.println(address,HEX);
    }
  }
  if (nDevices == 0) {
    Serial.println("No I2C devices found\n");
  }
  else {
    Serial.println("done\n");
  }
  delay(5000);
}
If using pins other than the default GPIO21 and GPIO22, the Wire.begin(SDA, SCL) function can be used, since we are using GPIO8 and GPIO9, Wire.begin(8, 9) is used in the setup() function. The code will output the I2C address of any devices connected to the I2C bus. For my device, the I2C address is 0x3C, keep this address in mind for later.
Calibrating sensor data and outputting to OLED display
Calibrating the moisture sensor
The moisture sensor is relatively simple to read, after connecting the sensor, it can directly be read using the analogRead() function. However, the sensor outputs quite a large range, in my case from ~3000 to ~7500. This is not directly useful for determining the moisture level of the soil, so the sensor was calibrated to output a range between 0 to 100. To do this, a 0% moisture level was determined by reading the sensor in the air, and the 100% moisture level was determined by placing the sensor in the water. The difference between the two values was used to scale the sensor output linearly to a range of 0 to 100. I have yet to test whether this is a valid assumption, and depending on the initial calibration, the current readings after scaling can exceed 100 and go below 0. However, during my testing this occurs infrequently.
I wrote a class moistureSensor to store the moisture sensor calibration data (useful for when multiple sensors are added). There is a read() method within the class that reads a scaled moisture value. There are also calibrate_low() and calibrate_high() methods that calibrate the sensor to the current moisture level.
Code for calibrating moisture sensor
  // Moisture sensor class
  struct moistureSensor {
  int pin;
  int low;
  int high;
  bool calibrated;
  // function to read scaled 0-100 value (fix scaling function)
  double read() {
  int rawVal = analogRead(pin);
  int scale = high - low;
  double out = -(rawVal - low);
  return -out/scale*100;
  }
  // function to calibrate 0% moisture
  // Currently broken I think!
  void calibrate_low() {
  low = analogRead(pin);
  }
  // function to calibrate 100% moisture
  void calibrate_high() {
  high = analogRead(pin);
  }
  };

  // Function to calibrate sensors
  bool sensorsCalibrated = false;
  float moistureLevel = 100.0;
  void calibrateSensors() {
      moistureSensor mS17 = {17, 7550, 3050};
      display.clearDisplay();
      display.setCursor(0, 2);
      writer("Press and hold button for 3 seconds with moisture sensor in the air");

      waitForPress();
      // mS17.calibrate_low();
      mS17.low = analogRead(mS17.pin)
      writer("0% humidity calibrated");
      delay(2000);

      display.clearDisplay();
      display.setCursor(0, 2);
      writer("Press and hold button for 3 seconds with moisture sensor in the water");
      waitForPress();
      // mS17.calibrate_high();
      mS17.high = analogRead(mS17.pin)
      writer("100% humidity calibrated");

      display.clearDisplay();
      display.setCursor(0, 2);
      writer("Calibration complete.");
      delay(1000);
      display.clearDisplay();
      delay(50);

  // return true;
  }
Outputting to OLED display
To output to the OLED display, the Adafruit_SSD1306 and Adafruit GFX library needs to first be installed. To check whether or not the OLED display is wired correctly, we can use the example script ssd1306_128x64_i2c.ino from the Adafruit_SSD1306 library, which can be accessed via Files > Examples > Adafruit SSD1306 > ssd1306_128x64_i2c in Arduino IDE. By default, the GPIO21 and GPIO22 pins and the 0x3D I2C address is used in the script. Change these to use the correct GPIO pins and I2C address if necessary.
To make the display output text in a prettier way, I wrote a typewriter animation function that prints text to display one character at a time.
Putting it all together
To put all these things together, I wrote a function that allows you to calibrate the moisture sensor by pressing a button. When plugging in the ESP32, the OLED display will display the steps needed to calibrate the moisture sensor. The button needs to be pressed to get a 0% moisture reading and pressed again to get a 100% moisture reading. In a future iteration, I plan to make the calibration process more accurate by pressing and holding the button for 3 seconds and take the average calibration value over that time.
After calibrating the sensor, the pump will automatically turn on for 3 seconds if the moisture level is below 60%. Since it takes a while for soil to saturate, the pump will only turn on once every 60 seconds. The code for the implementation can be found below.
Next steps
- Calibrate length that pump is on for
- Add pump countdown timer on the screen
- Connect pump to a 3D printed ‘sprinkler’ that evenly distributes moisture.
Video
Circuit schematic
Complete code
/*
Code for automatic watering system.
Calibrates moisture sensor, reads moisture level from calibrated sensor, and turns on pump for 3 seconds if moisture level is below 60%.
*/
// OLED display
#include <SPI.h>
#include <Wire.h>
#include <Adafruit_GFX.h>
#include <Adafruit_SSD1306.h>
// Pin numbers
const int buttonPin = 2; // the number of the pushbutton pin
const int ledPin = 13; // the number of the LED pin
const int moisturePin = 17;
const int A1A = 41; // define pin 3 for A-1A
const int A1B = 40; // define pin 4 for A-1B
// variables
int buttonState = 0; // variable for reading the unsigned
unsigned long display_refresh = millis();
unsigned long pump_refresh = millis();
unsigned long pump_start = millis();
// Moisture sensor class
struct moistureSensor {
int pin;
int low;
int high;
bool calibrated;
// function to read scaled 0-100 value (fix scaling function)
double read() {
int rawVal = analogRead(pin);
int scale = high - low;
double out = -(rawVal - low);
return -out/scale*100;
}
// function to calibrate 0% moisture
// Currently broken I think!
void calibrate_low() {
low = analogRead(pin);
}
// function to calibrate 100% moisture
void calibrate_high() {
high = analogRead(pin);
}
};
// OLED Screen
#define SCREEN_WIDTH 128 // OLED display width, in pixels
#define SCREEN_HEIGHT 64 // OLED display height, in pixels
#define OLED_RESET -1 // Reset pin # (or -1 if sharing Arduino reset pin)
#define SCREEN_ADDRESS 0x3C ///< See datasheet for Address; 0x3D for 128x64, 0x3C for 128x32
Adafruit_SSD1306 display(SCREEN_WIDTH, SCREEN_HEIGHT, &Wire, OLED_RESET);
// Global variables
moistureSensor mS17 = {17, 7550, 3050, false};
void writer (char *message, int lag=50, bool newline=true) {
char *msgptr = message;
while (*msgptr) {
display.write(*msgptr++);
display.display();
delay(lag);
}
if (newline){
display.println("");
}
}
void waitForPress() {
while (digitalRead(buttonPin) == LOW) {
// Do nothing
}
};
bool sensorsCalibrated = false;
float moistureLevel = 100.0;
void calibrateSensors() {
moistureSensor mS17 = {17, 7550, 3050};
display.clearDisplay();
display.setCursor(0, 2);
writer("Press and hold button for 3 seconds with moisture sensor in the air");
waitForPress();
// mS17.calibrate_low();
mS17.low = analogRead(mS17.pin)
writer("0% humidity calibrated");
delay(2000);
display.clearDisplay();
display.setCursor(0, 2);
writer("Press and hold button for 3 seconds with moisture sensor in the water");
waitForPress();
// mS17.calibrate_high();
mS17.high = analogRead(mS17.pin)
writer("100% humidity calibrated");
display.clearDisplay();
display.setCursor(0, 2);
writer("Calibration complete.");
delay(1000);
display.clearDisplay();
delay(50);
// return true;
}
void setup() {
// initialize the LED pin as an output:
pinMode(ledPin, OUTPUT);
pinMode(A1A, OUTPUT); // specify these pins as outputs
pinMode(A1B, OUTPUT);
digitalWrite(A1A, LOW); // start with the motors off
digitalWrite(A1B, LOW);
// initialize the pushbutton pin as an input:
pinMode(buttonPin, INPUT);
ESP32PWM::allocateTimer(0);
ESP32PWM::allocateTimer(1);
ESP32PWM::allocateTimer(2);
ESP32PWM::allocateTimer(3);
myservo.setPeriodHertz(50); // standard 50 hz servo
myservo.attach(servoPin, 500, 2400);
Serial.begin(9600);
Serial.print("Initializing Moisture Sensor on Pin 17");
Serial.println(mS17.pin);
if(!display.begin(SSD1306_SWITCHCAPVCC, 0x3C)) { // Address 0x3D for 128x64
Serial.println(F("SSD1306 allocation failed"));
for(;;);
}
display.clearDisplay();
display.setTextSize(1);
display.setTextColor(WHITE);
display.setCursor(0, 10);
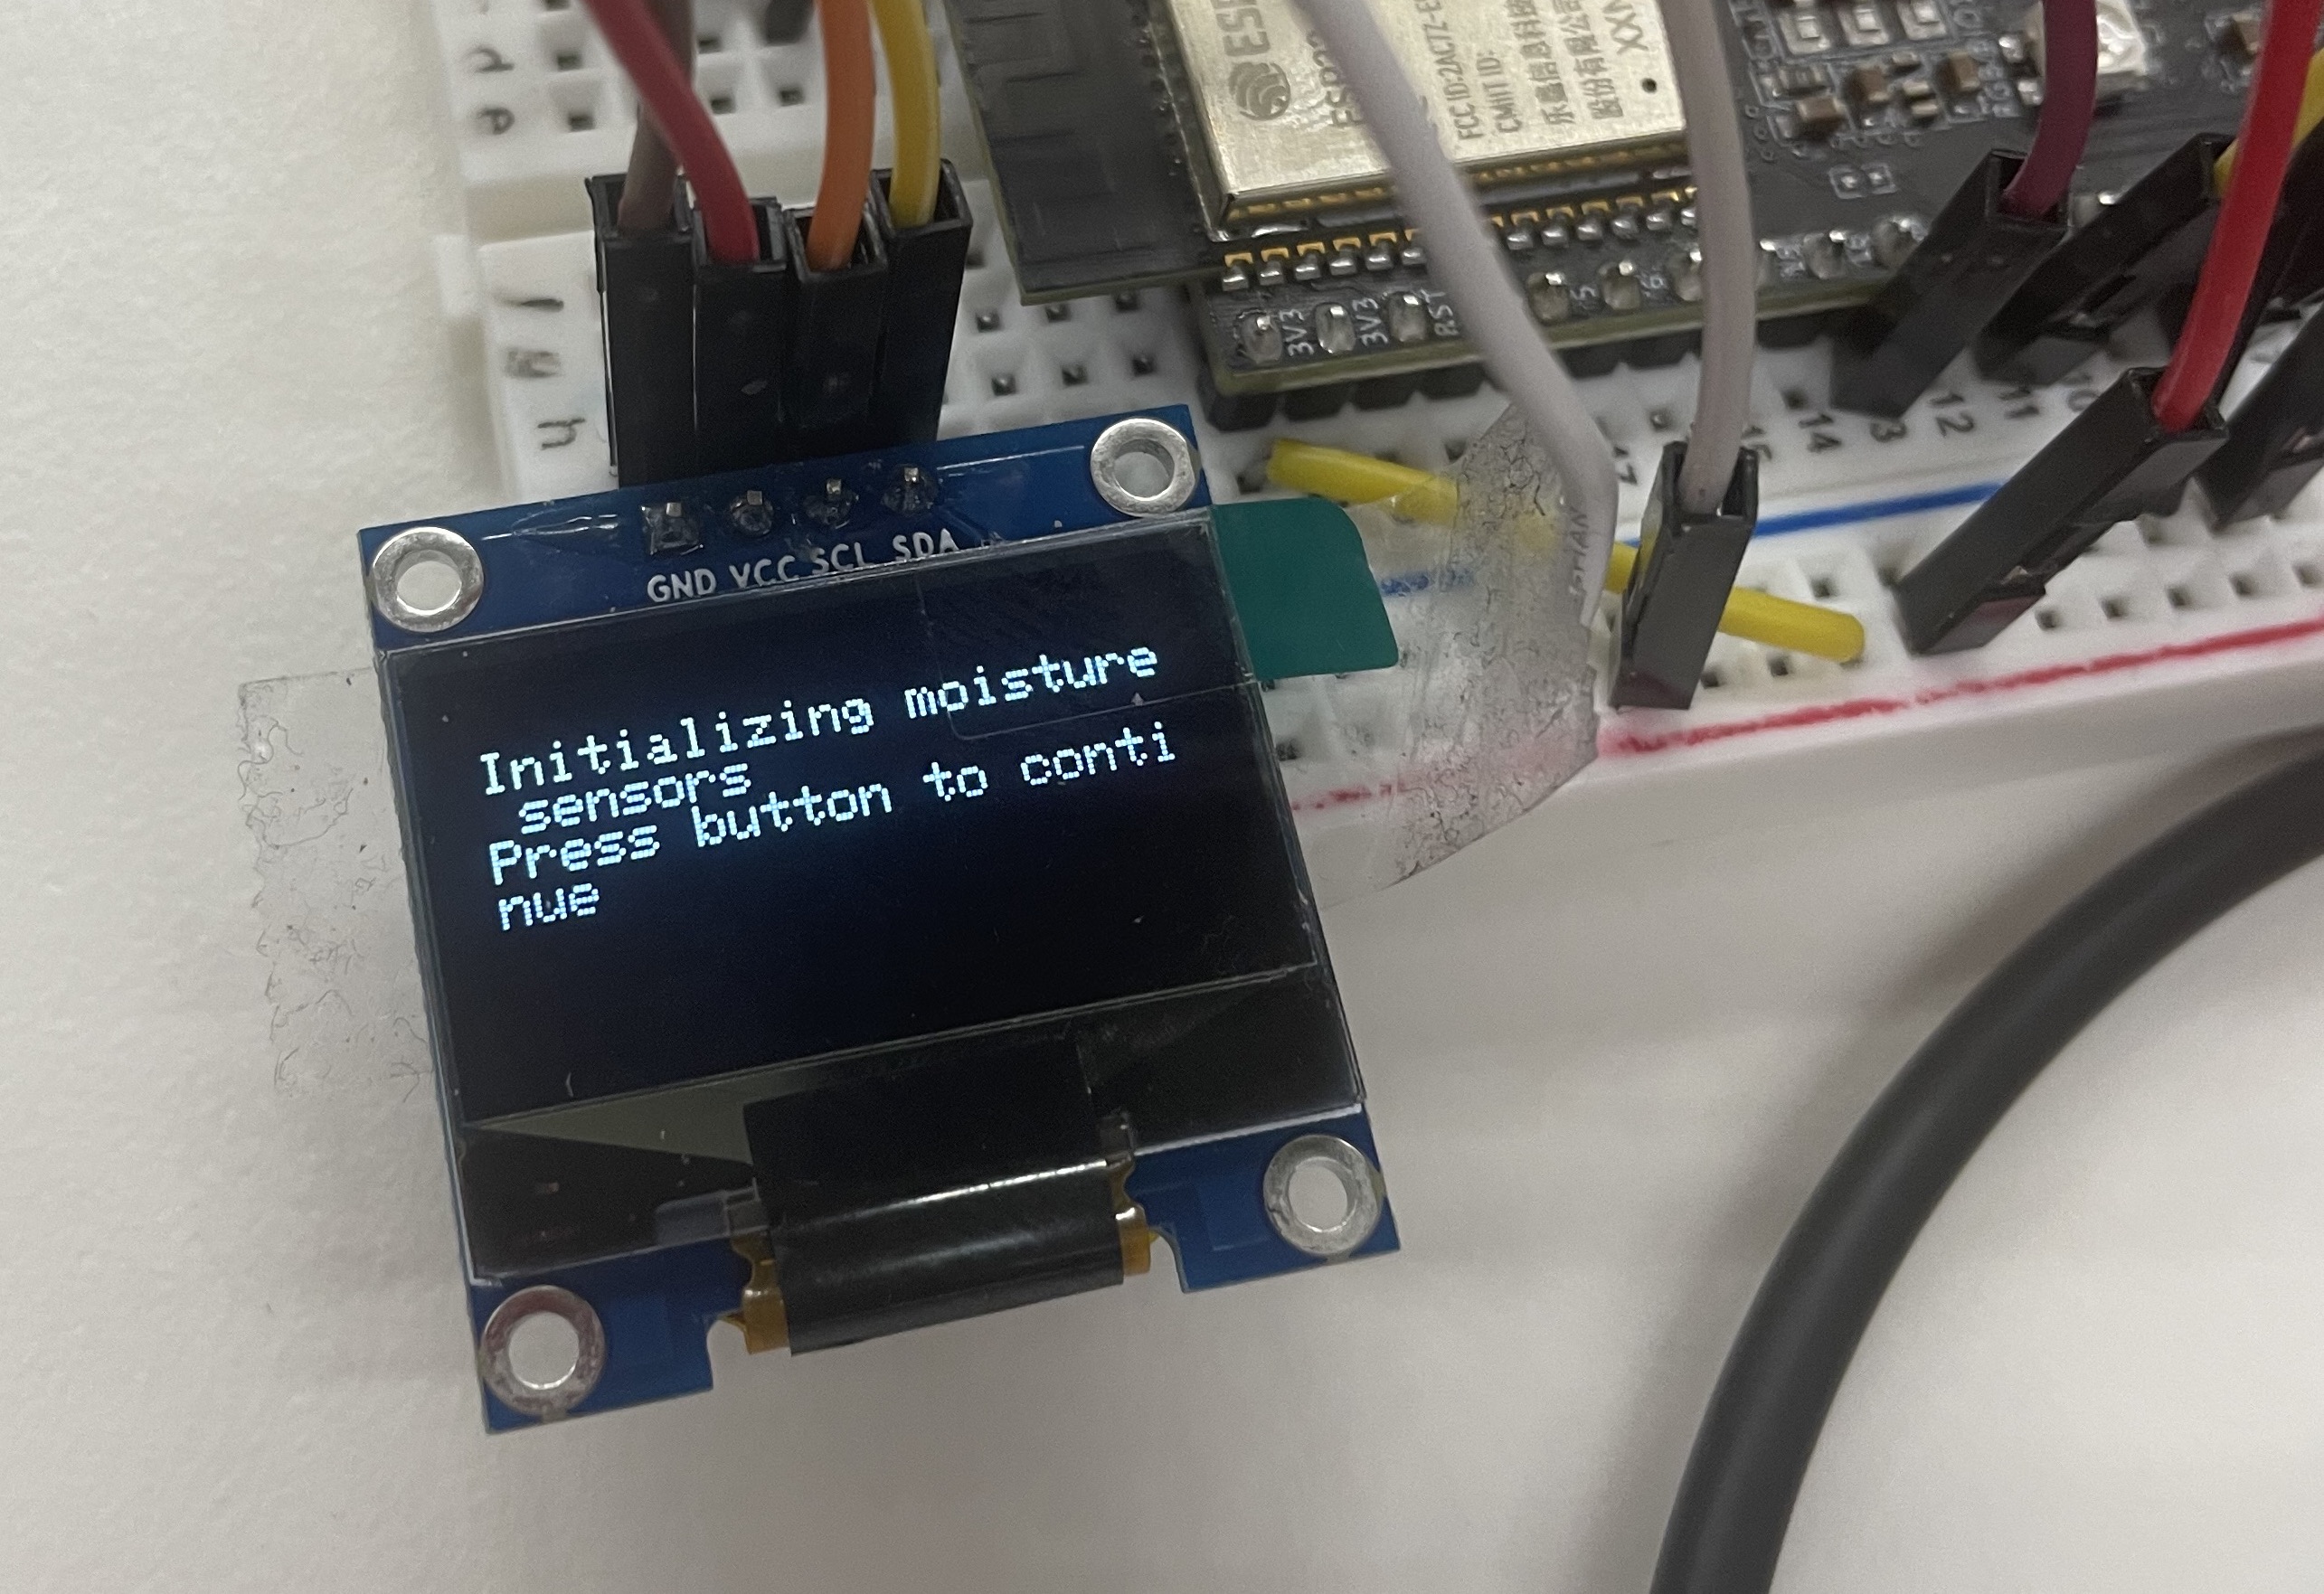
writer("Initializing moisture sensors");
writer("Press button to continue");
waitForPress();
calibrateSensors(); // TODO: Calibrate sensors for 3 seconds instead of 1 instant.
display.clearDisplay();
delay(500);
}
// Code to detect long button press.
// void buttonLongPress() {
// uint32_t duration = 0;
// if (digitalRead(buttonPin) == LOW) {
// if (pressReadLimit == 0) {
// pressTime = millis();
// pressReadLimit = 1;
// }
// duration = millis() - pressTime;
// if (duration >= 3000) {
// Serial.println("Long press");
// }
// Serial.println(duration);
// } else {
// duration = 0;
// pressReadLimit = 0;
// }
// }
// unsigned long time;
// unsigned long display_refresh;
void loop() {
// read the state of the pushbutton and sensor
buttonState = digitalRead(buttonPin);
moistureLevel = mS17.read();
Serial.println(millis() - display_refresh);
// if (millis() - display_refresh > 500){ // Moved display refresh to bottom of loop
display_refresh = millis();
display.clearDisplay();
display.setCursor(12, 2);
display.setTextSize(2);
display.println("Moisture %");
display.setTextSize(3);
display.setCursor(20, 32);
display.println(moistureLevel);
display.display();
// }
if (moistureLevel < 60){
if (millis() - pump_refresh > 60000){ // 60 seconds
pump_start = millis();
// start_pump
digitalWrite(A1A, HIGH);
digitalWrite(A1B, LOW);
delay(3000);
digitalWrite(A1A, LOW);
digitalWrite(A1B, LOW);
// stop pump
pump_refresh = millis();
}
// if (millis() - pump_start > 3000){
// digitalWrite(A1A, LOW);
// digitalWrite(A1B, LOW);
// }
}
if (moistureLevel > 60){
pump_start = millis(); // reset pump start
// Shut off pump
digitalWrite(A1A, LOW);
digitalWrite(A1B, LOW);
}
// check if the pushbutton is pressed. If it is, the buttonState is HIGH:
if (buttonState == HIGH) {
digitalWrite(ledPin, HIGH);
} else {
digitalWrite(ledPin, LOW);
}
// TODO: add a recalibration system if button is continuously pressed for longer than 5 seconds.
delay(100); // display refresh rate
}