AI Tamagotchi
Table of contents
What if we could create a digital pet that you could talk to, and adapts to your personality?
Motivation
In this course, what I found most interesting was 3D design, microcontroller programming, networking and electronic input/output devices. I also wanted to build something intricately designed and small.
Growing up, I had many different types of digital pets. The first was a Tamagotchi , then it was a Digimon Digivice (basically a tamagotchi that you could use to battle your friends). These were the main two hand-held devices, before digital pets were brought to a game console, such as the Nintendo DS, where I had a digital dog called Nintendogs , and even the Switch where I had a digital cat in Little Friends: Cats and Dogs .
However, there were three things lacking in all these variations of digital pets.
- Handheld tamagochi’s are “too dumb”
- Digital pets on consoles are too inconvenient
- Digital pets on mobile phones are too distracting
We should be able to interact with our digital pet through voice, using ChatGPT, Speech Recognition, and Speech Synthesis. In this final project, I will be documenting the process of building my AI-powered tamagotchi that you can interact with vocally.
Capbabilities
- Talk to your pet (Microphone)
- Pet talks back (Speaker)
- Being able to see your pet, and interact with an interface (LCD Screen)
- Physical interaction (Buttons)
- Wireless (Battery and WiFi)
- Personality and voice recognition (Machine Learning)
Prototype
Materials
- ESP32-S2 DevKit
- IMNP441 I2S Microphone
- 128x64 I2C OLED Display
- 6x6x6 Tactile Push Button
- 10k Ohm Resistor
For the MVP prototype, I bread-boarded the electronic circuit in an attempt to get all the electronics working together. This was a good step since it allowed me to quickly diagnose circuit issues and test how many pins I would need to use in the final design.
The prototype used an I2C OLED display, 3 buttons and an I2S Microphone. At this stage, I was still troubleshooting using a speaker. Accessing the internal DAC on the ESP32-S2 DevKit was hard, and there wasn’t much documentation and examples of how to do this online. Following the tutorials such as the one by Circuit Digest .
The prototype was completed using a double-stacked breadboard.
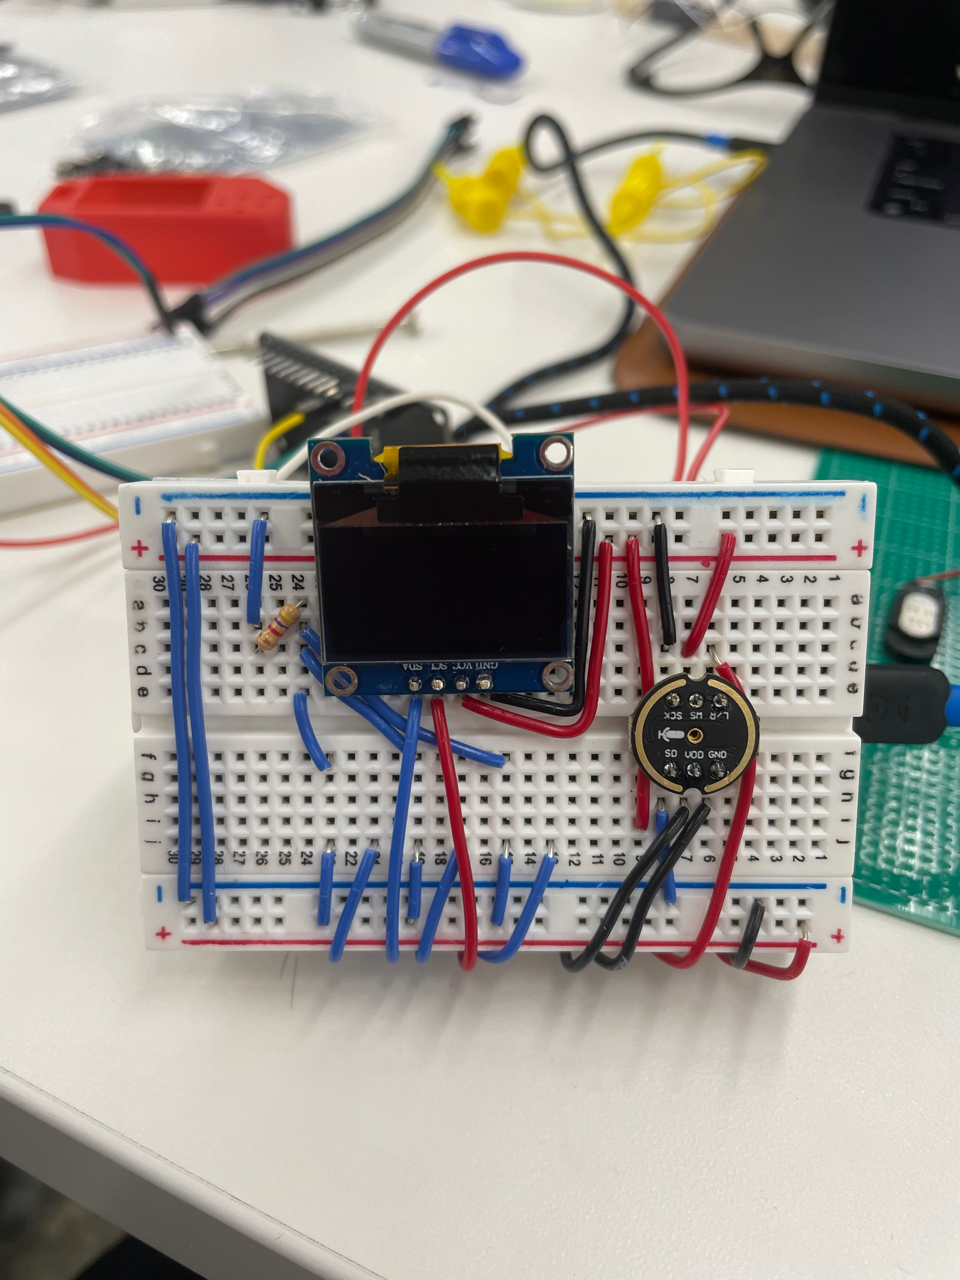
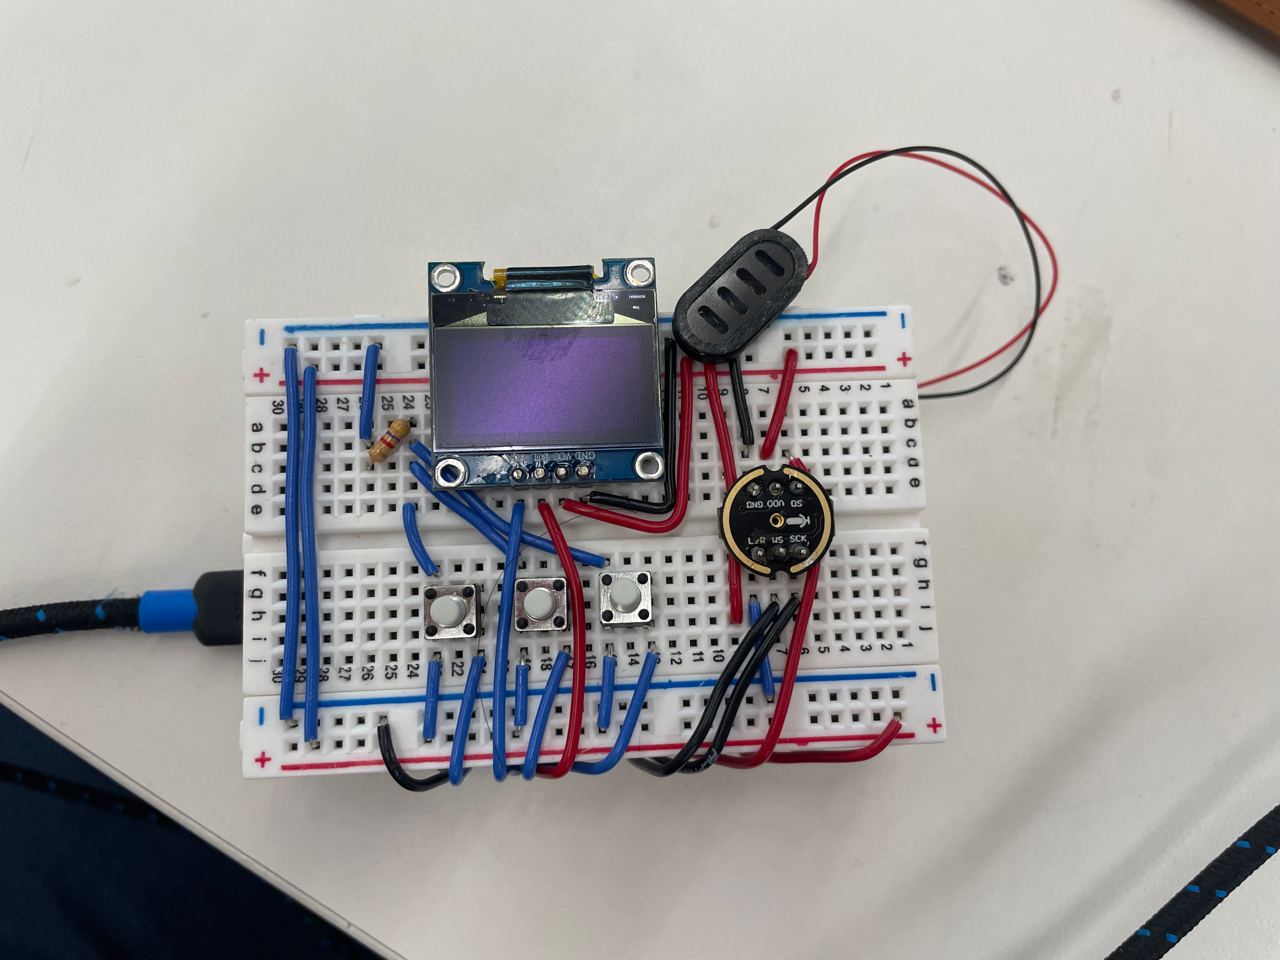
At this stage I hadn’t started coding yet, so I tested each component seperately using code that I wrote in previous weeks. Such as my speech recognition server in week 7 and my OLED display and buttons in week 4 . Everything was working at this stage apart from the speaker, so I decided to move on to finalize the software and final product design.
Product design
I went through three major design iterations, and around ten minor design revisions.
First design
The first design was the chunky breadboard design. I took a photo of the breadboard and used calipers to create a simple faceplate on Fusion360.
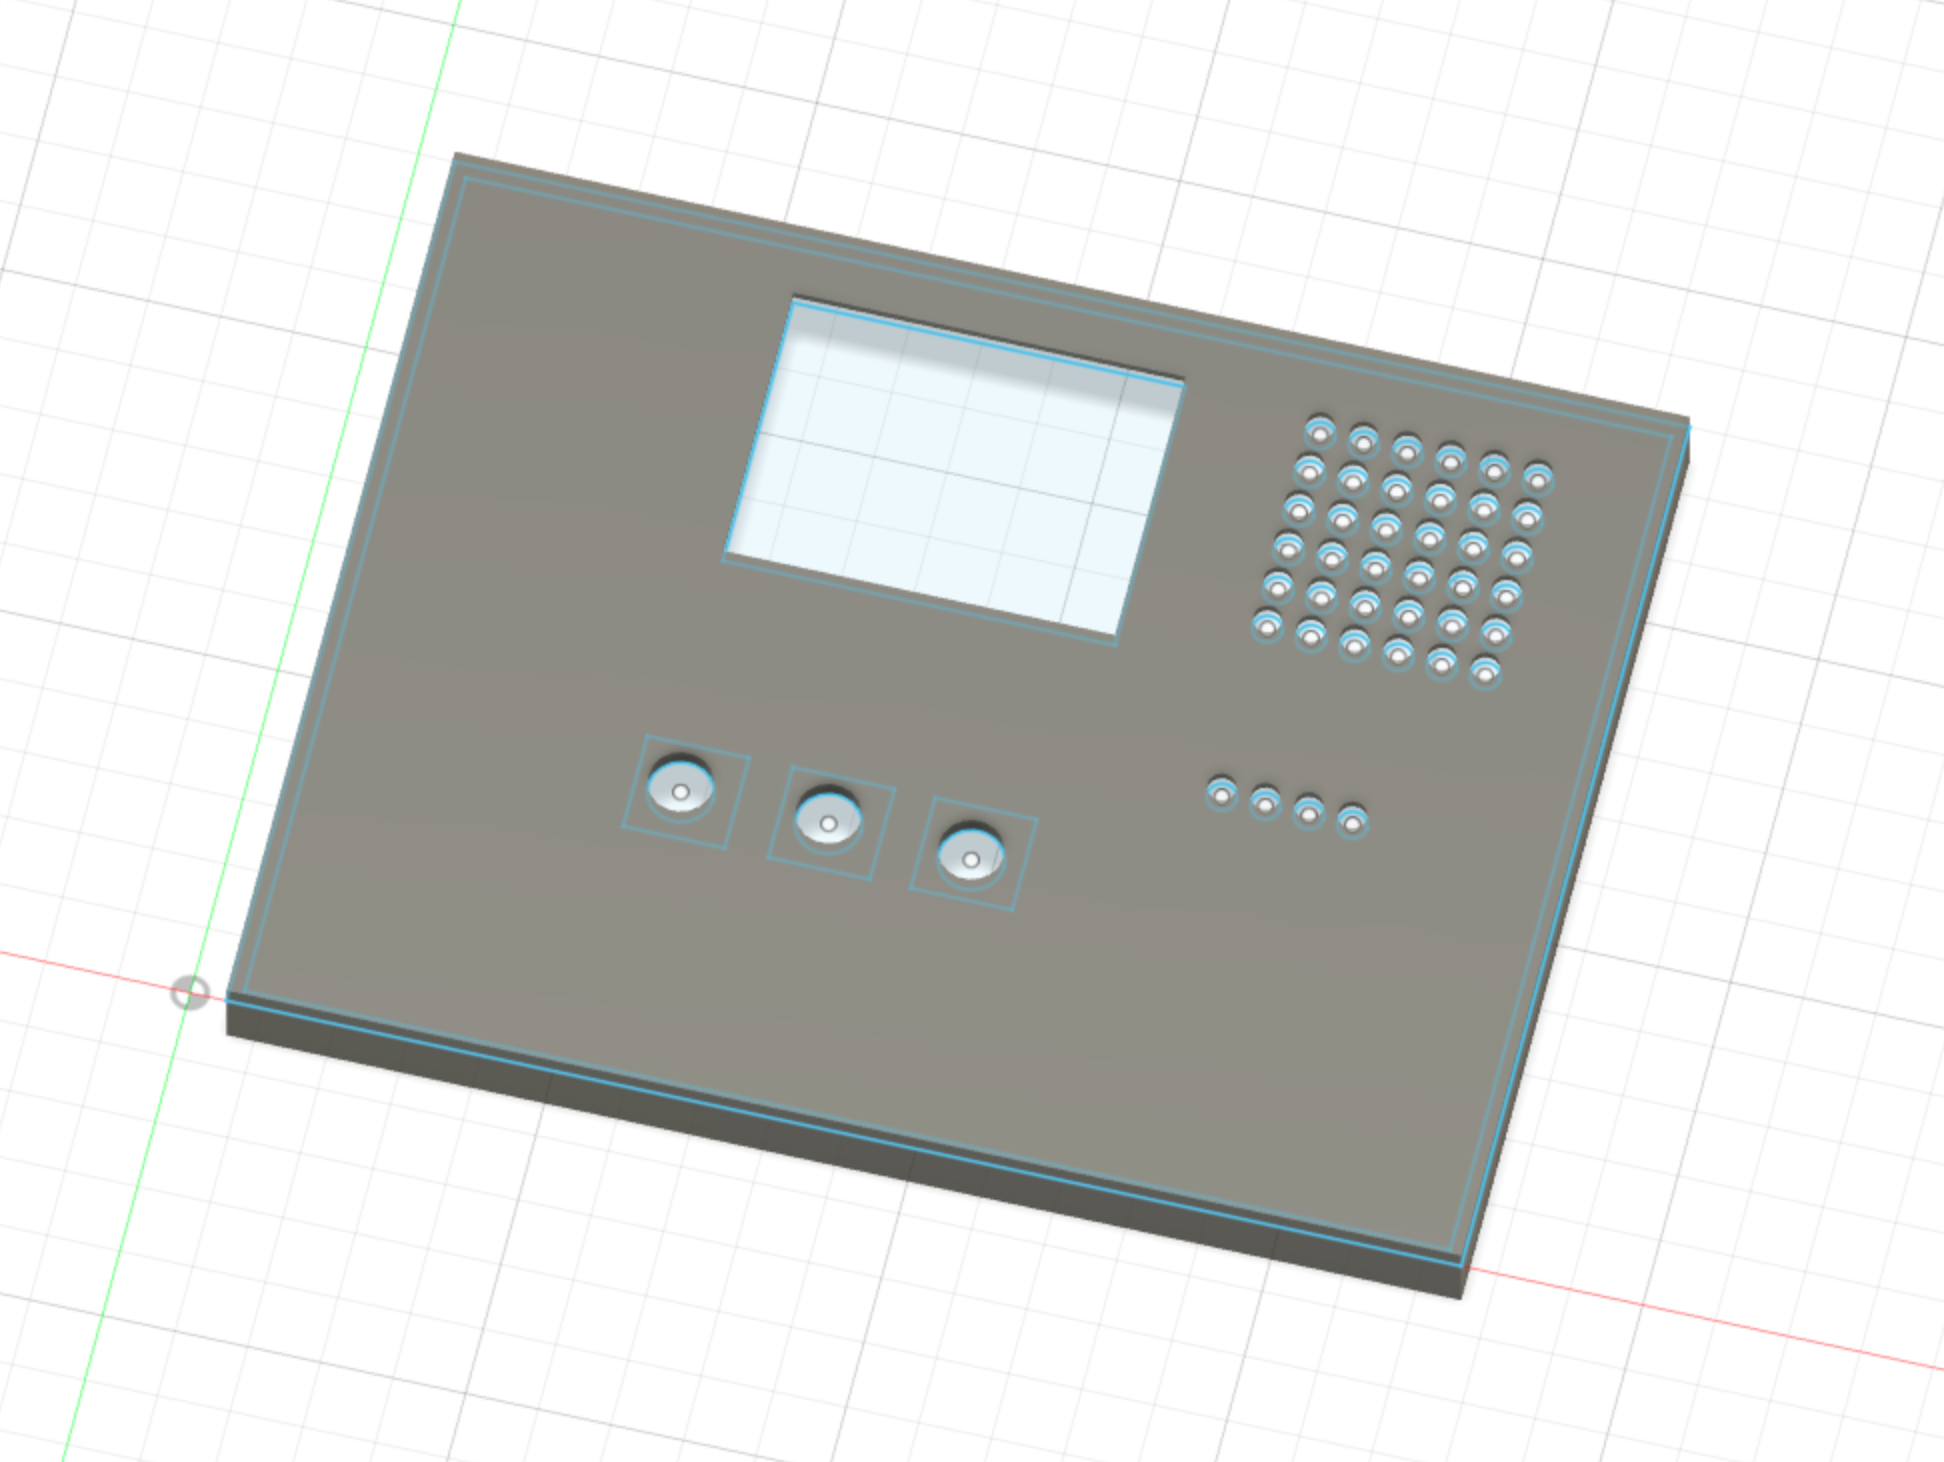
This was much too large compared to my initial vision of the product. I wanted something that was small and at the very least could fit into my pocket. Ideally something that was Airpod or original tamagochi sized.
Materials
- 1x 1.8" SPI TFT LCD Display (ST7735)
- 1x IMNP441 I2S Microphone
- 1x Mini 1W Speaker
- 4x 6x6x7 Tactile Push Button (4Pin)
- 1x 820mah Li-Poly Battery
- 1x Adafruit HUZZAH32
Second design
In the second iteration, I created a finalized list of parts to use in my final project and created a design that would fit every single component perfectly with minimal loss in space.
I was inspired by the design philosophy of the Flipper Zero . Following this inspiration, I came up with the following design. This design was very close in style to the Airpods
However, since my components hadn’t yet arrived I underestimated the size of each component. For example, I assumed that the screen was 1.8-2" diagonally and designed a model for that. However, when I obtained the 1.8" TFT LCD display, the diagonal size of the component was 2.7" diagonally, so the components didn’t fit into this design. I also didn’t take into account space for the wires and the battery. After printing out a prototype of this design, I realized that the button spacing was not correct, the microphone did not fit exactly into the holder and the speaker grill was too large.
I tried to fix these issues by scaling the design proportionally to fit the size of the screen, however the design lost its charm when it was larger since the ratio of the speaker to the screen did not look great.
Third design
Version A
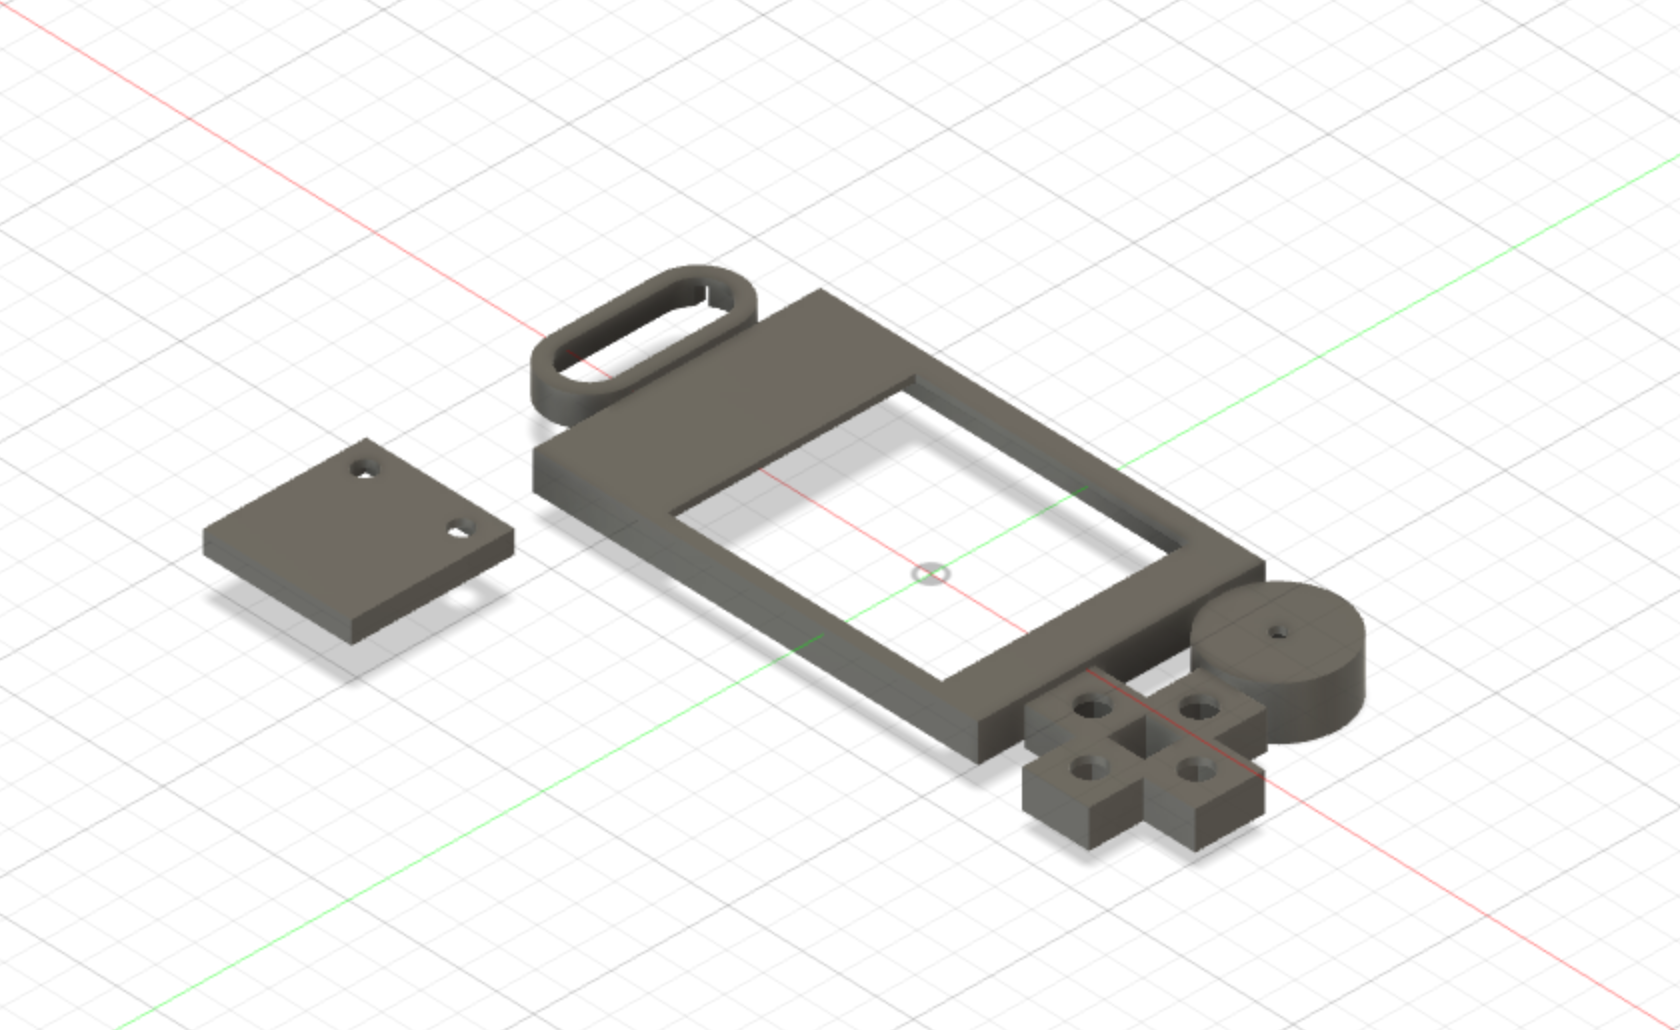
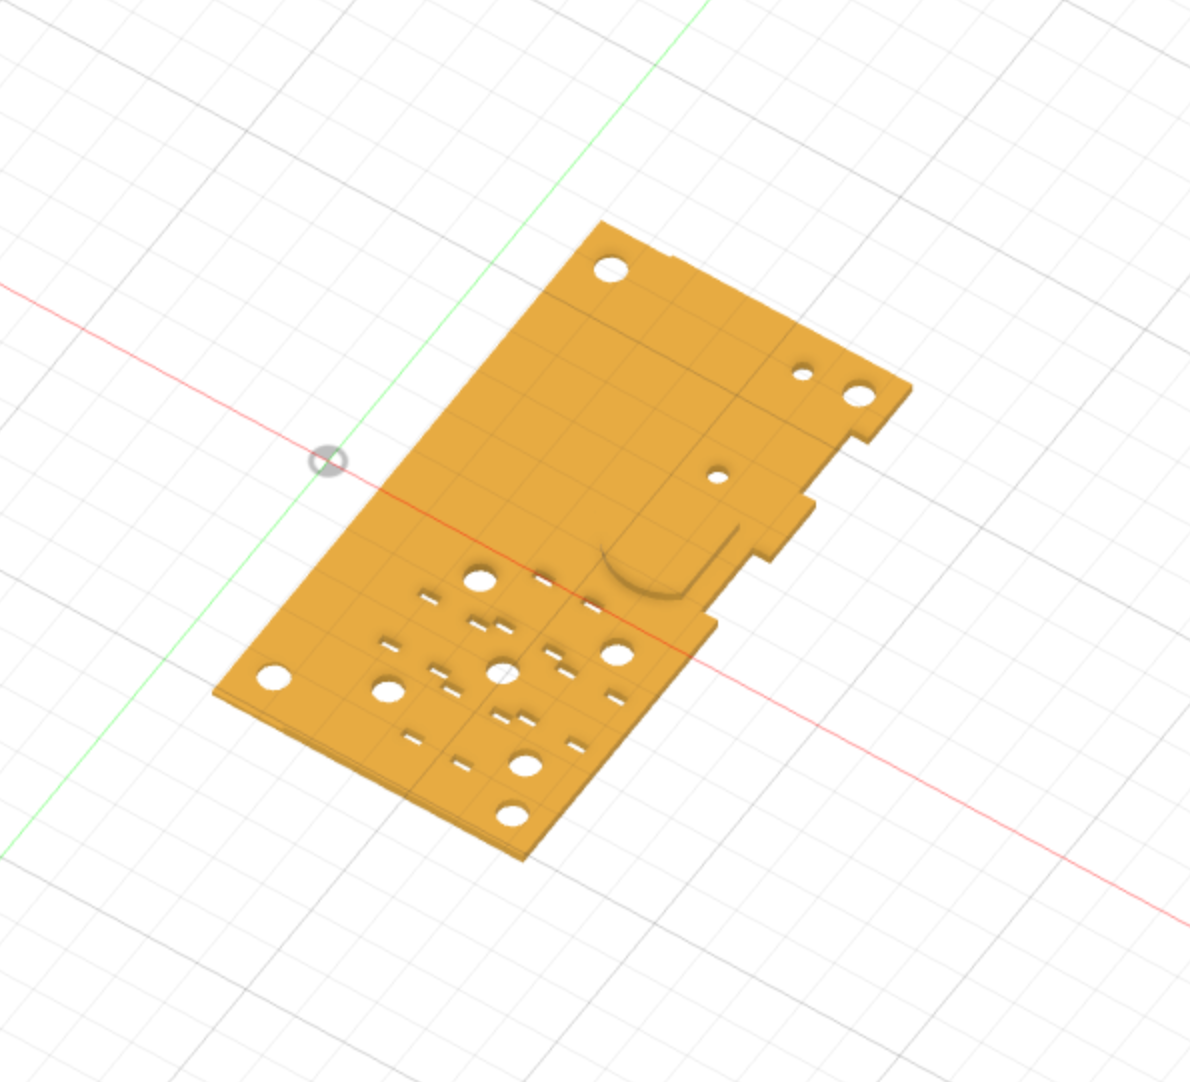
In the third iteration, I decided to measure each component exactly and design mini-casings for each component shown below. I put these components next to each other into a design, which dicated how small my device could be. This also had the advantage since now I can design the casing around the components, and know that every component will fit exactly, the D-Pad was the most difficult to design and required alot of iterations since the tolerance of the buttons was very small. It was very easy for the buttons to be slightly tilted and ruin the fit and finish of the final product.

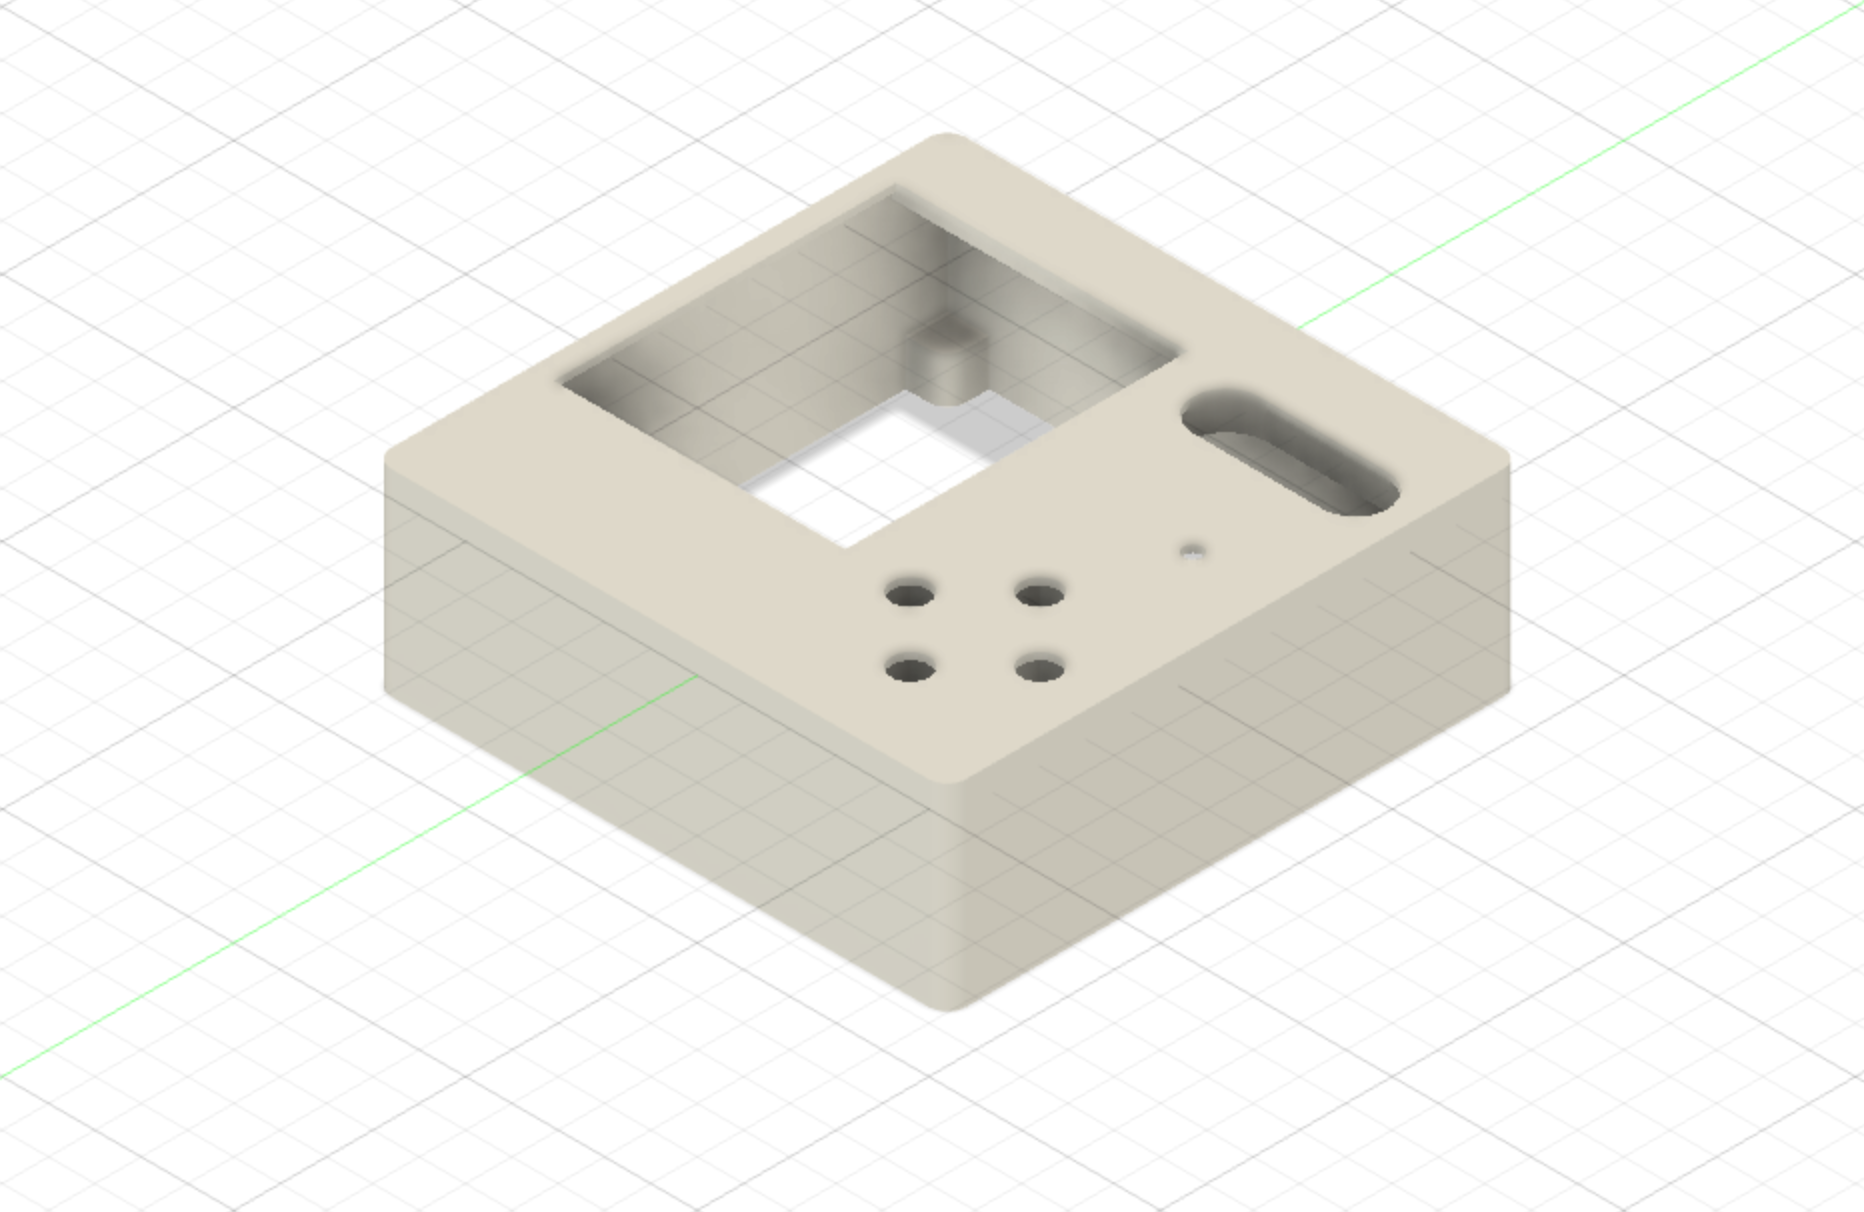
I didn’t really like this layout since it makes the screen look very small, and it’s too long and skinny. This was mainly because the screen had a very big chin from the ribbon cable and the PCB that it was attached onto (this can be seen in the asymmetrical screen casing in the image below.)
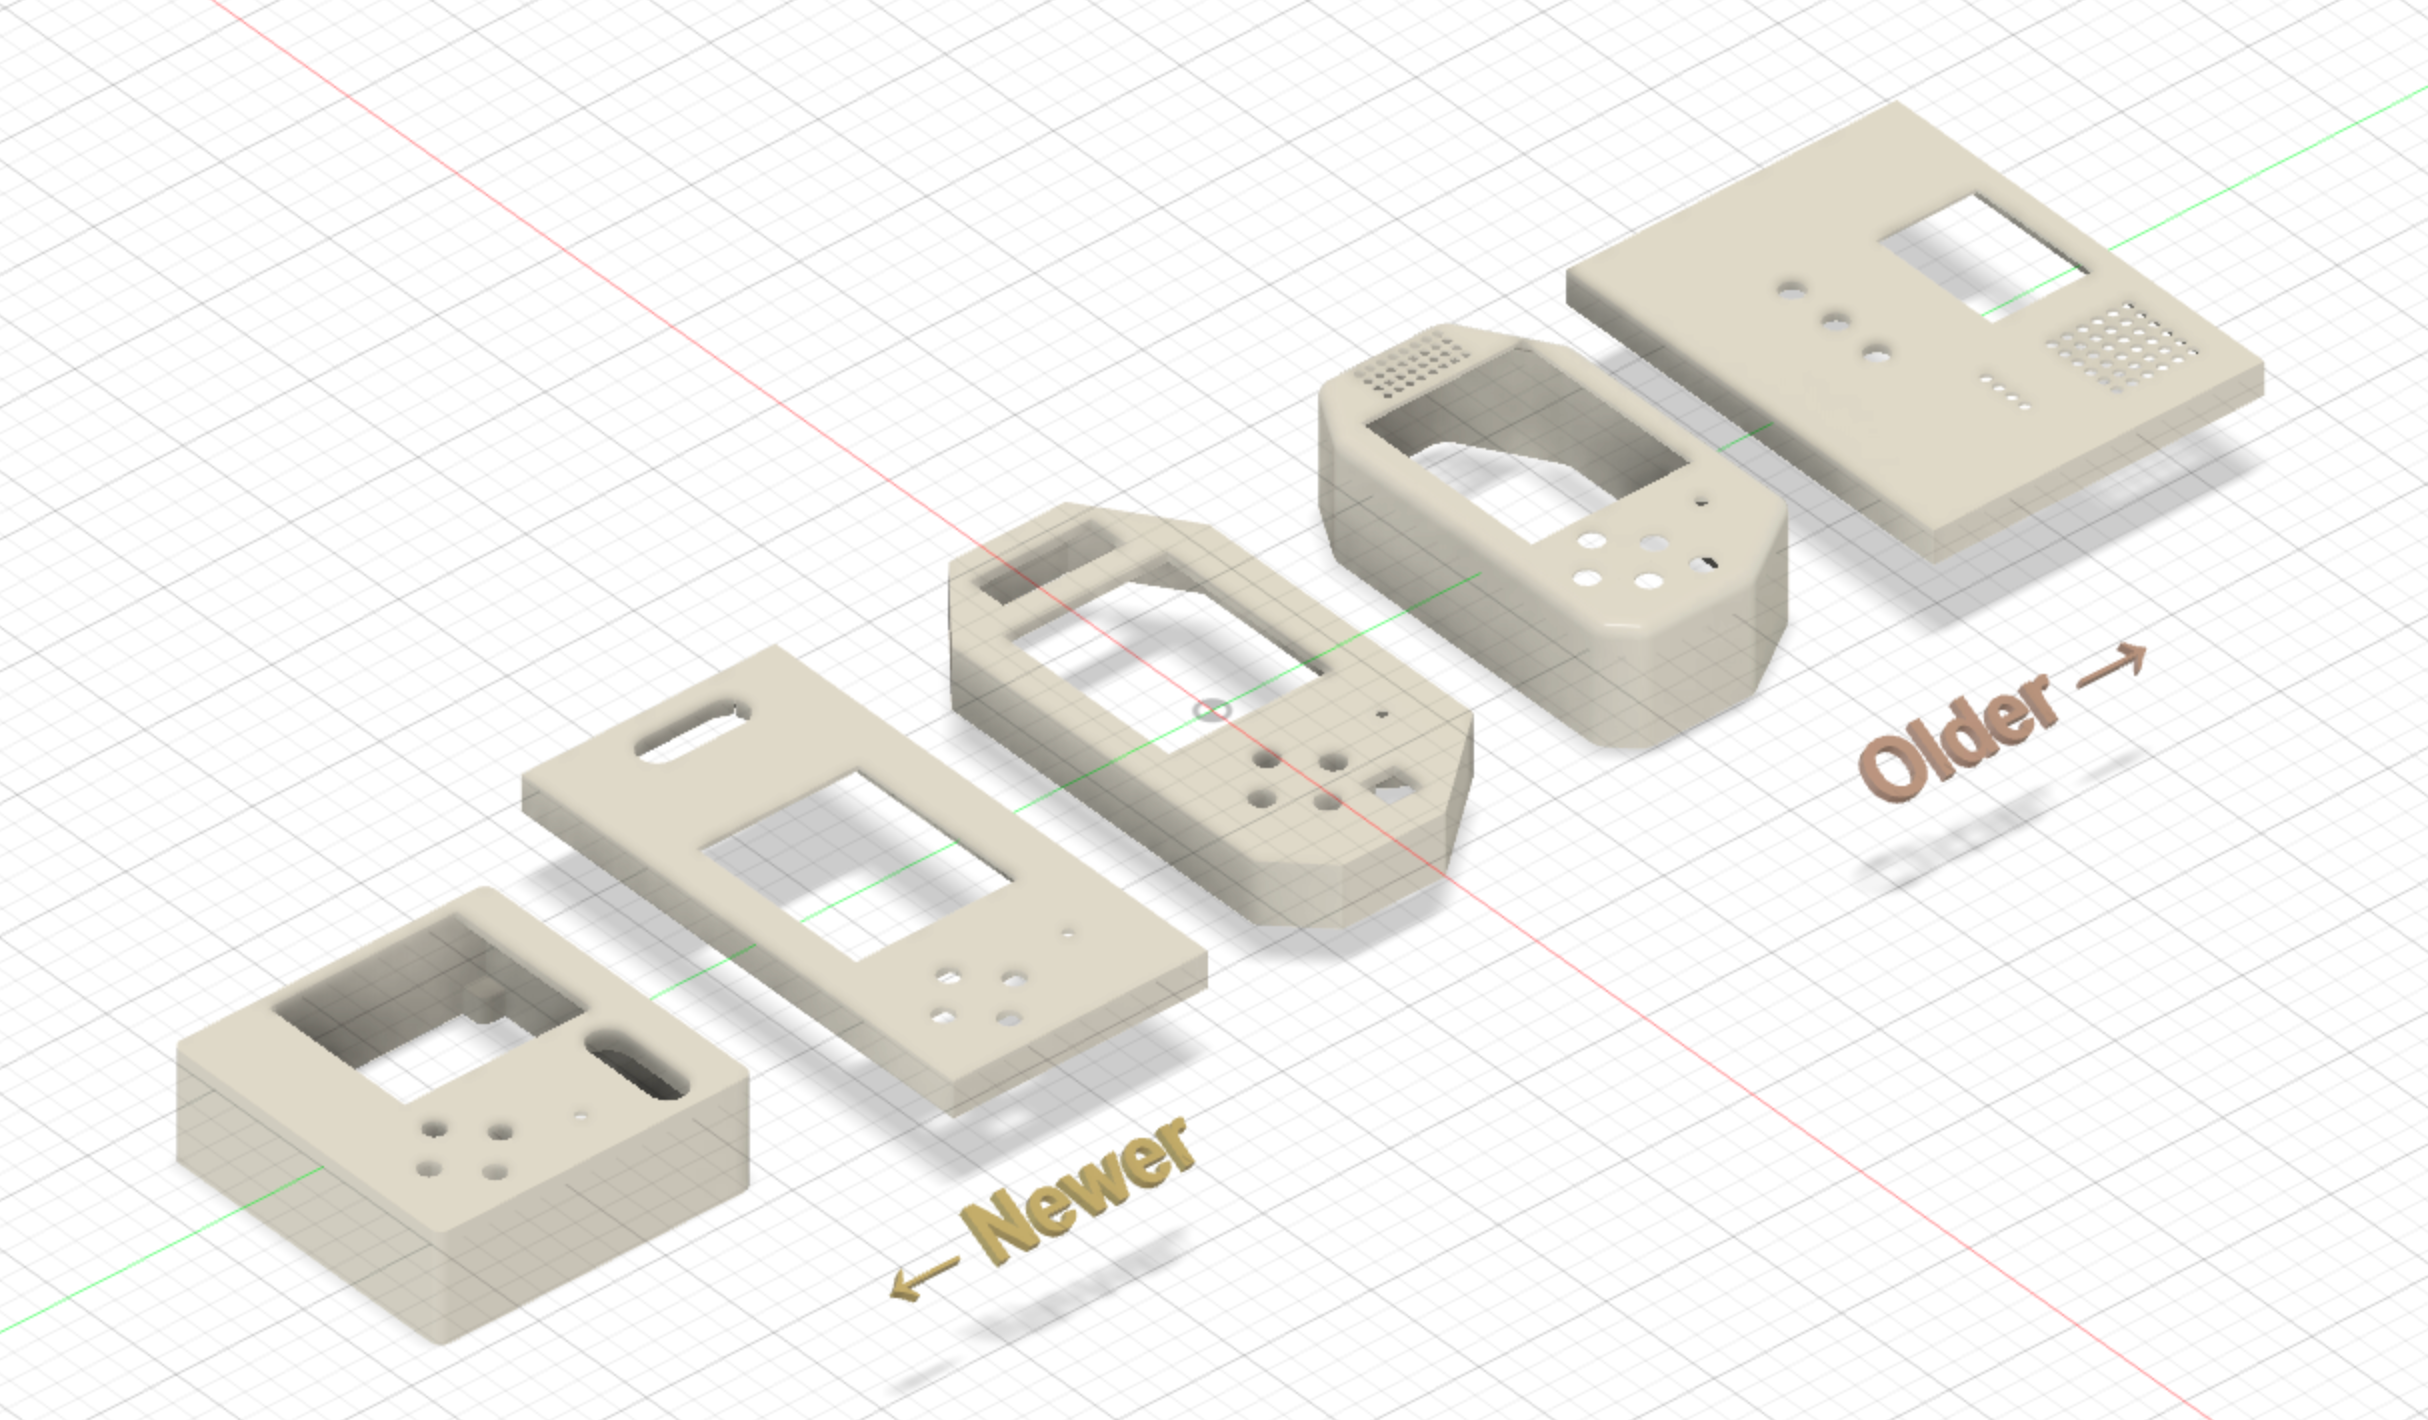
A graphic of the condensed design iteration process (minus revisions) is shown below.
Final design
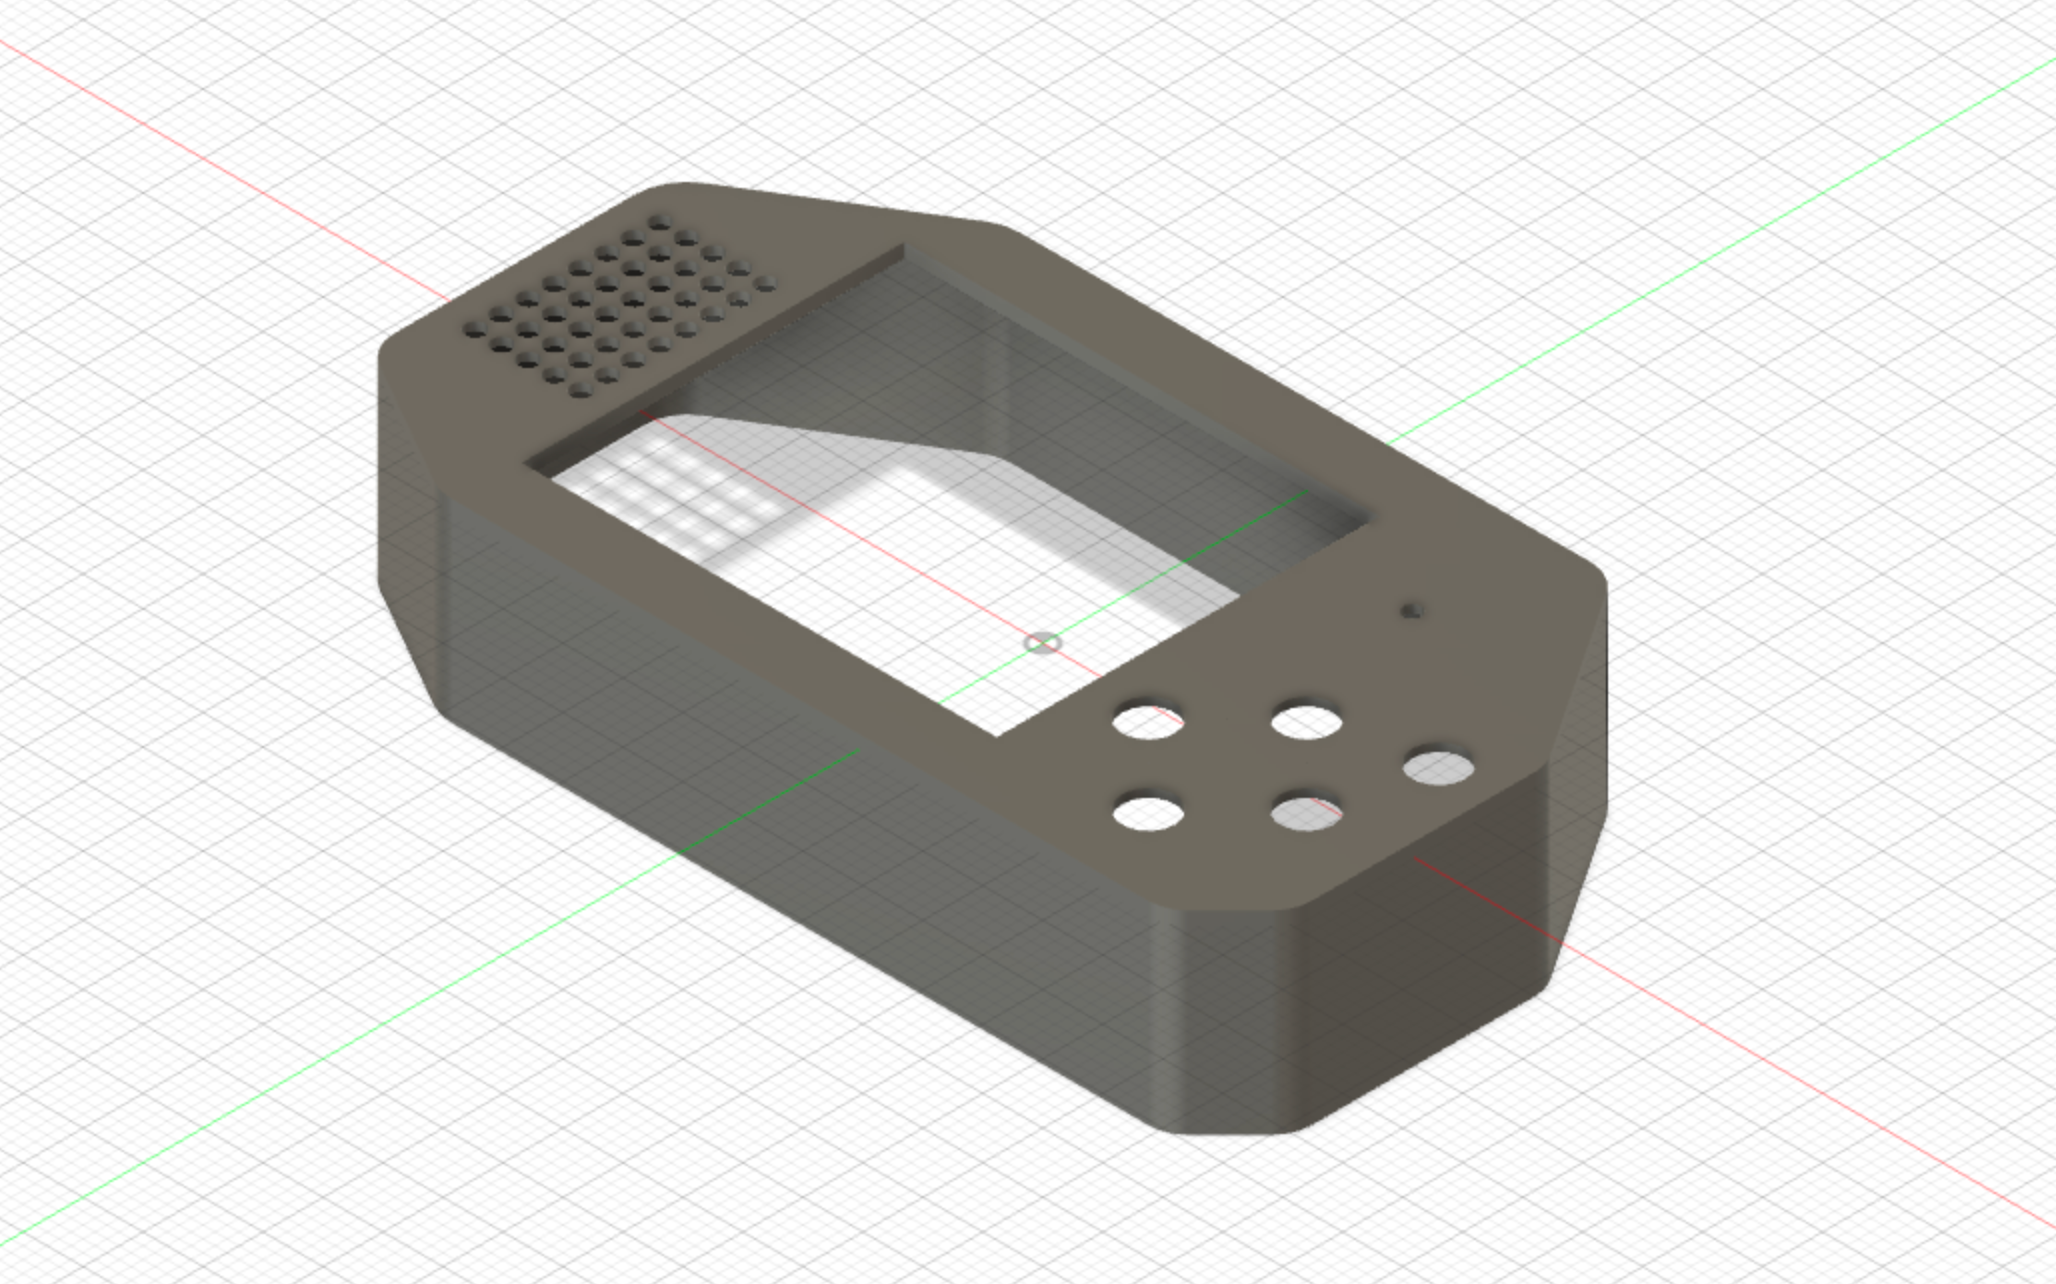
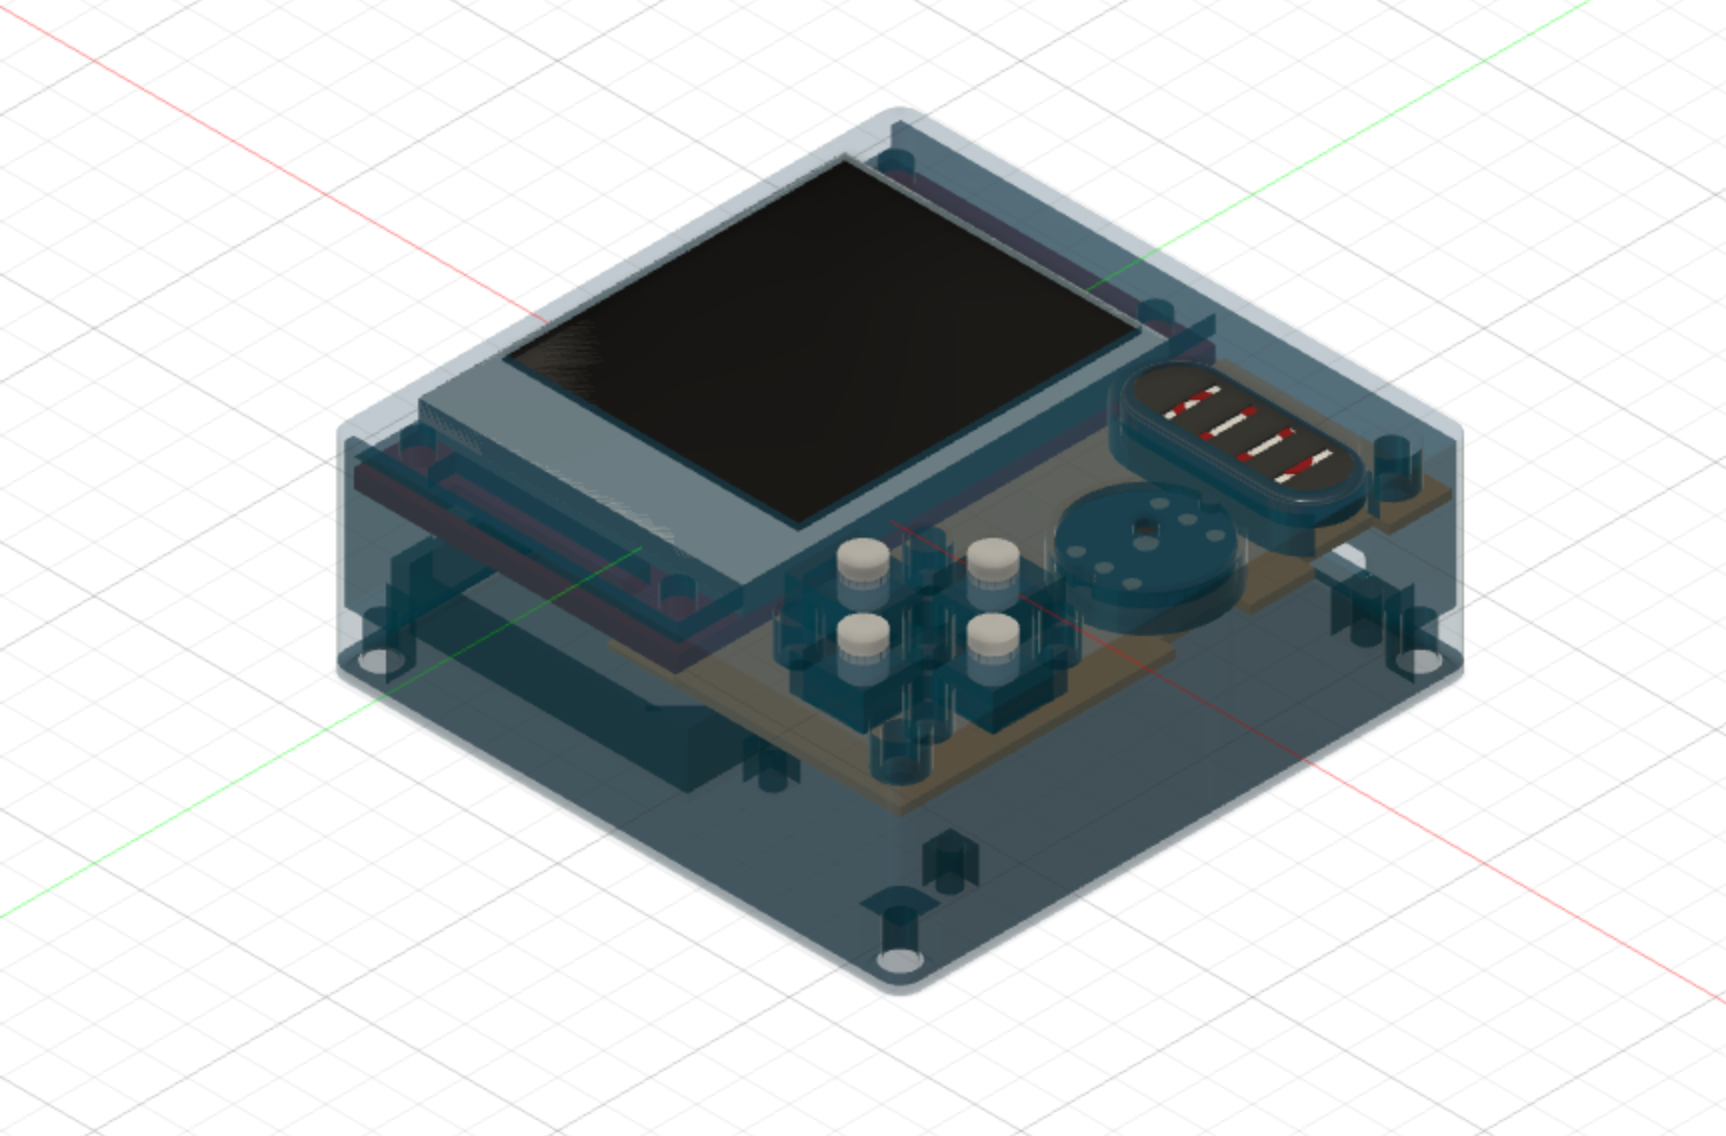
After doing abit of drawing and redesign, I decided to make the screen vertical in the style of the original tamagochi. I also took advantage of the 3D aspect of the build, so I could hide unimportant components, such as the I2S Speaker Amplifier behind the screen to make the design slightly (~1mm) thicker but more compact overall.
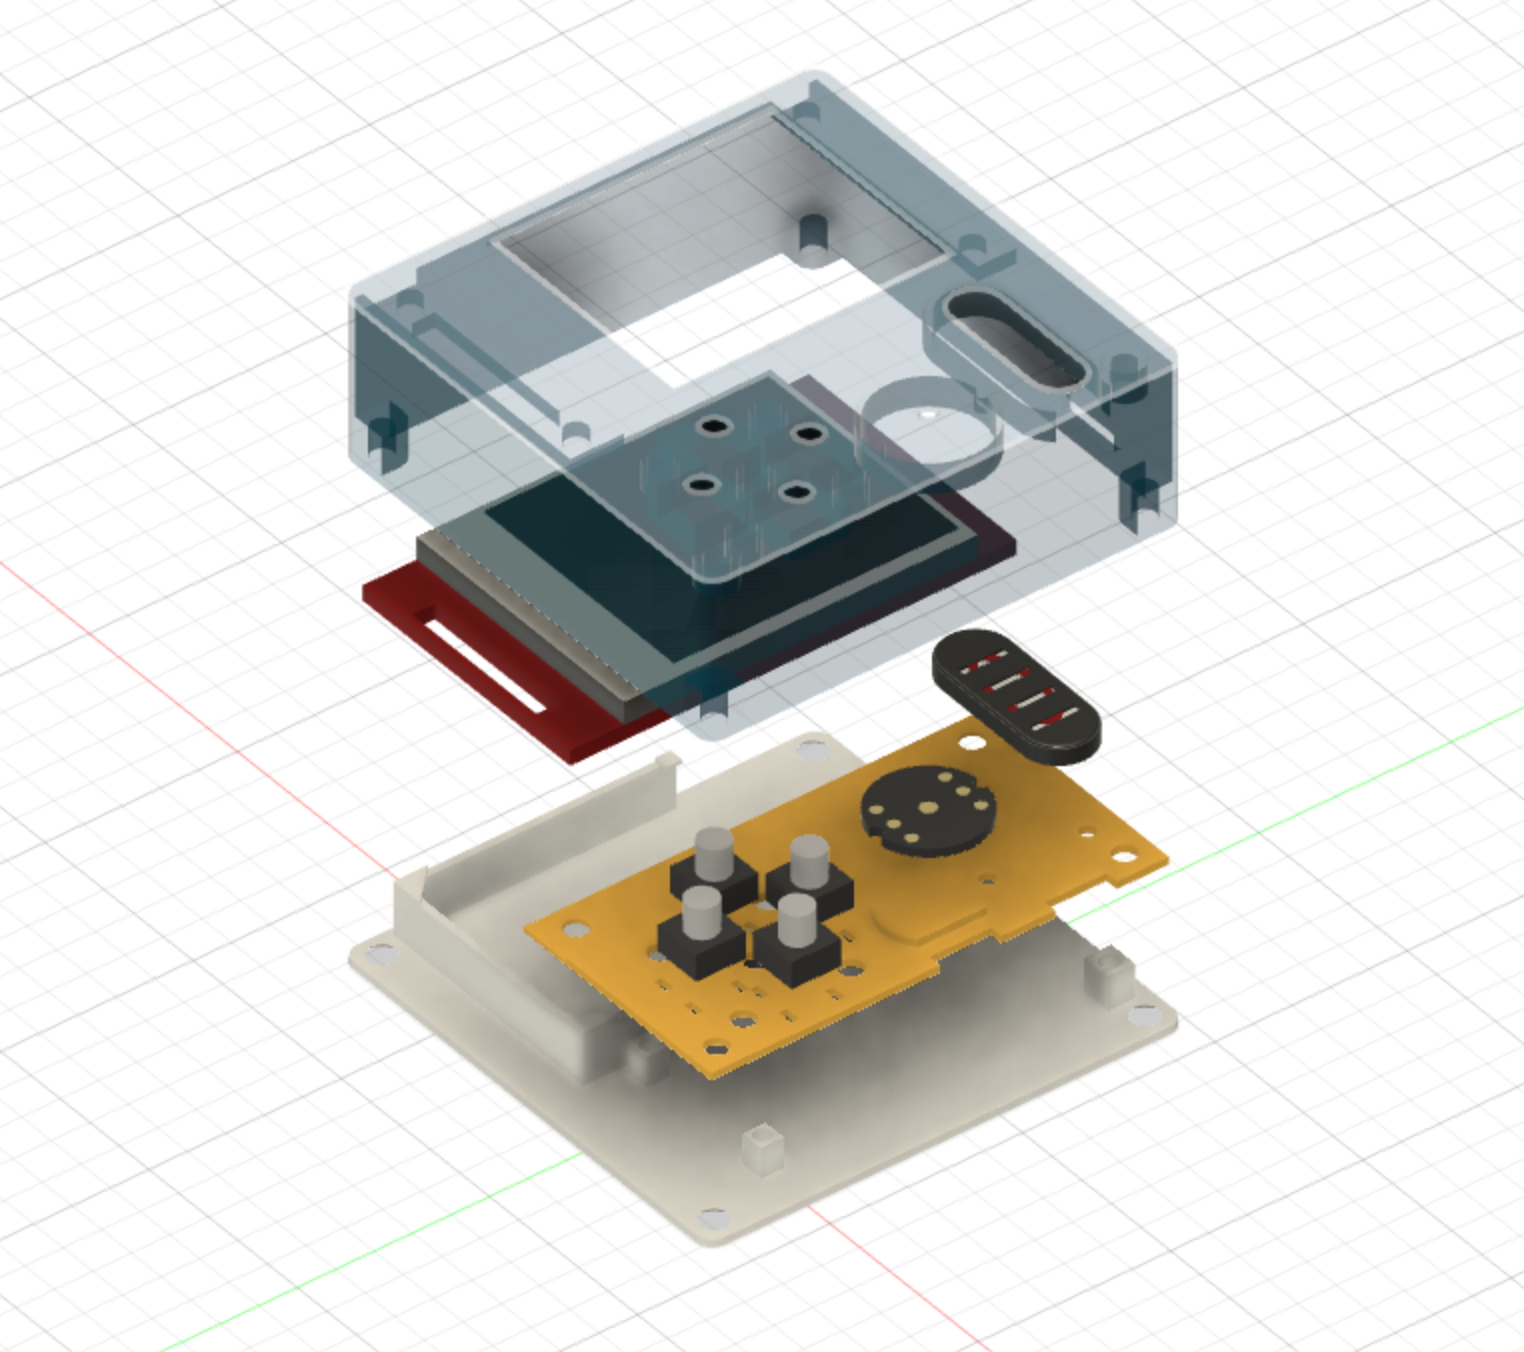
The design consists of a front-face:
A backplate which holds all the components (microphone, speaker, buttons and amplifier)
And a backface which holds the battery and the ESP32.
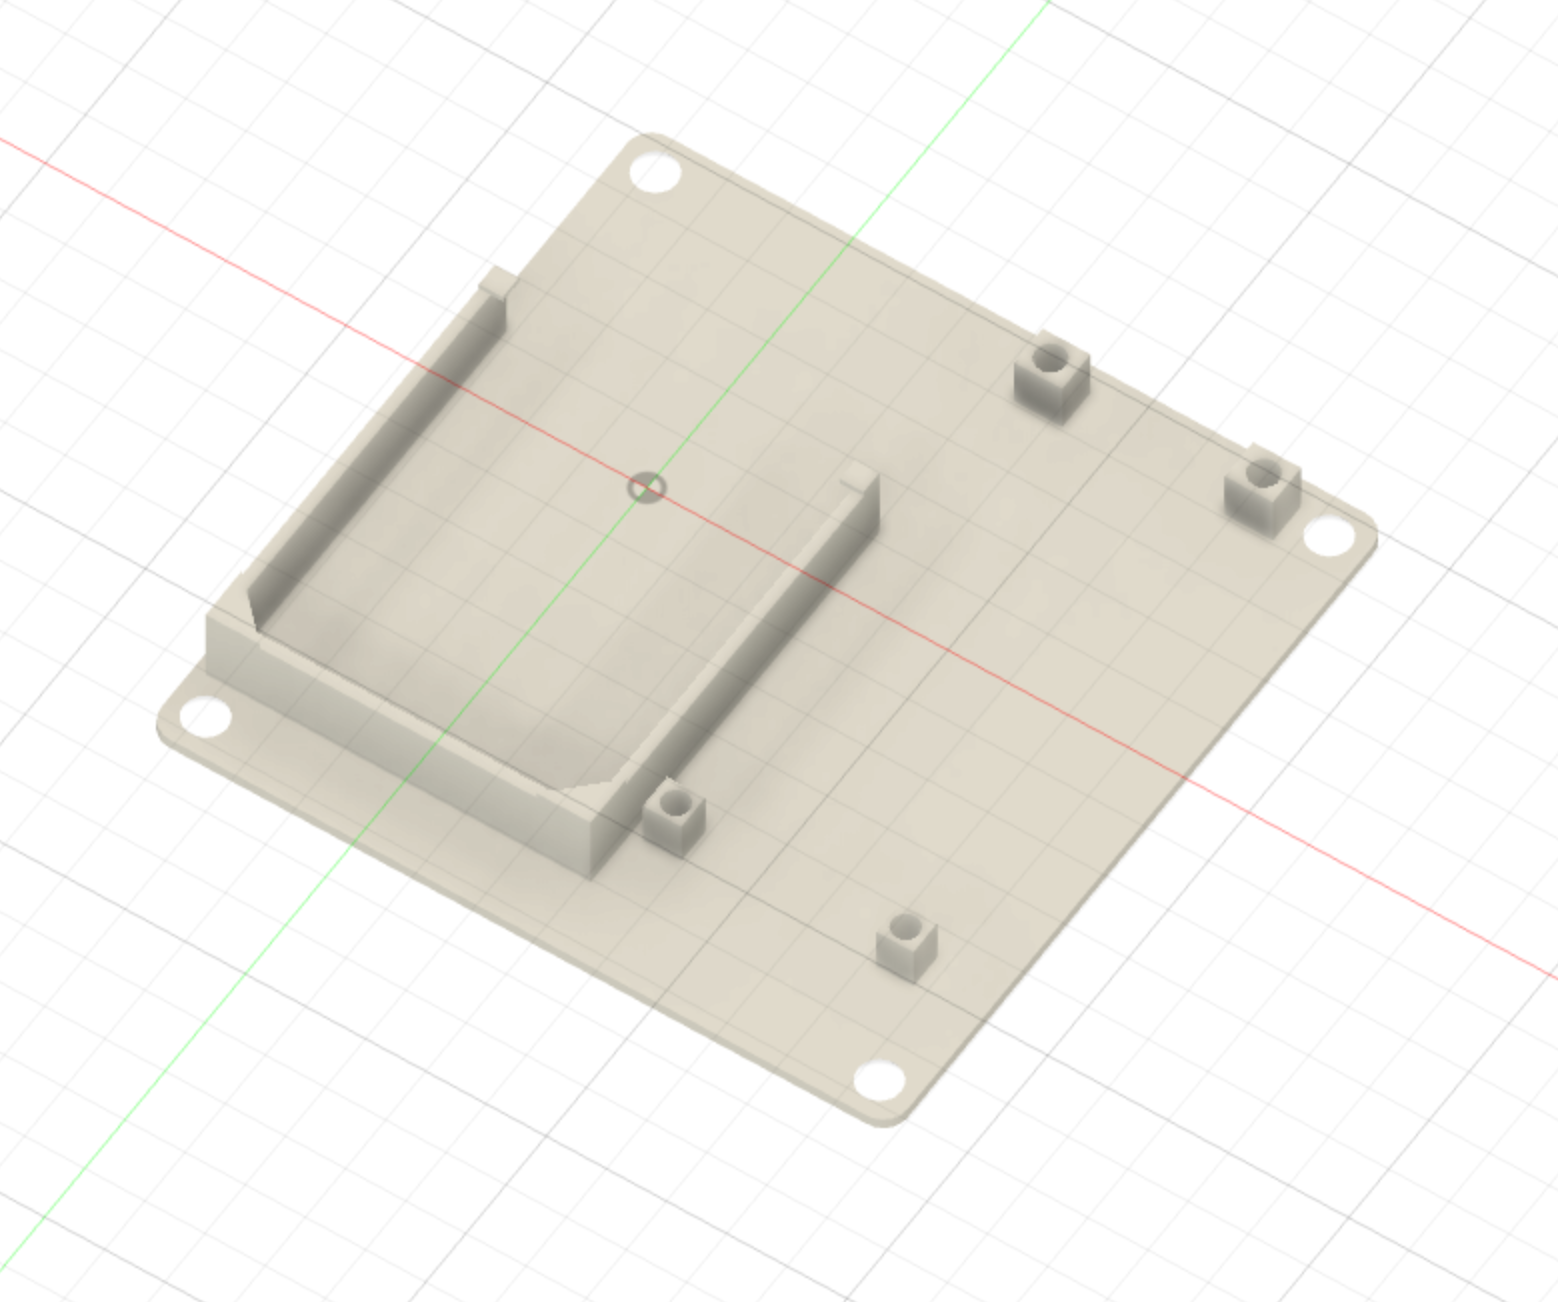
Everything is held in via M2 and M3 screws.
The final product design as well as a cross-section is shown below. Everything fits neatly and tightly.

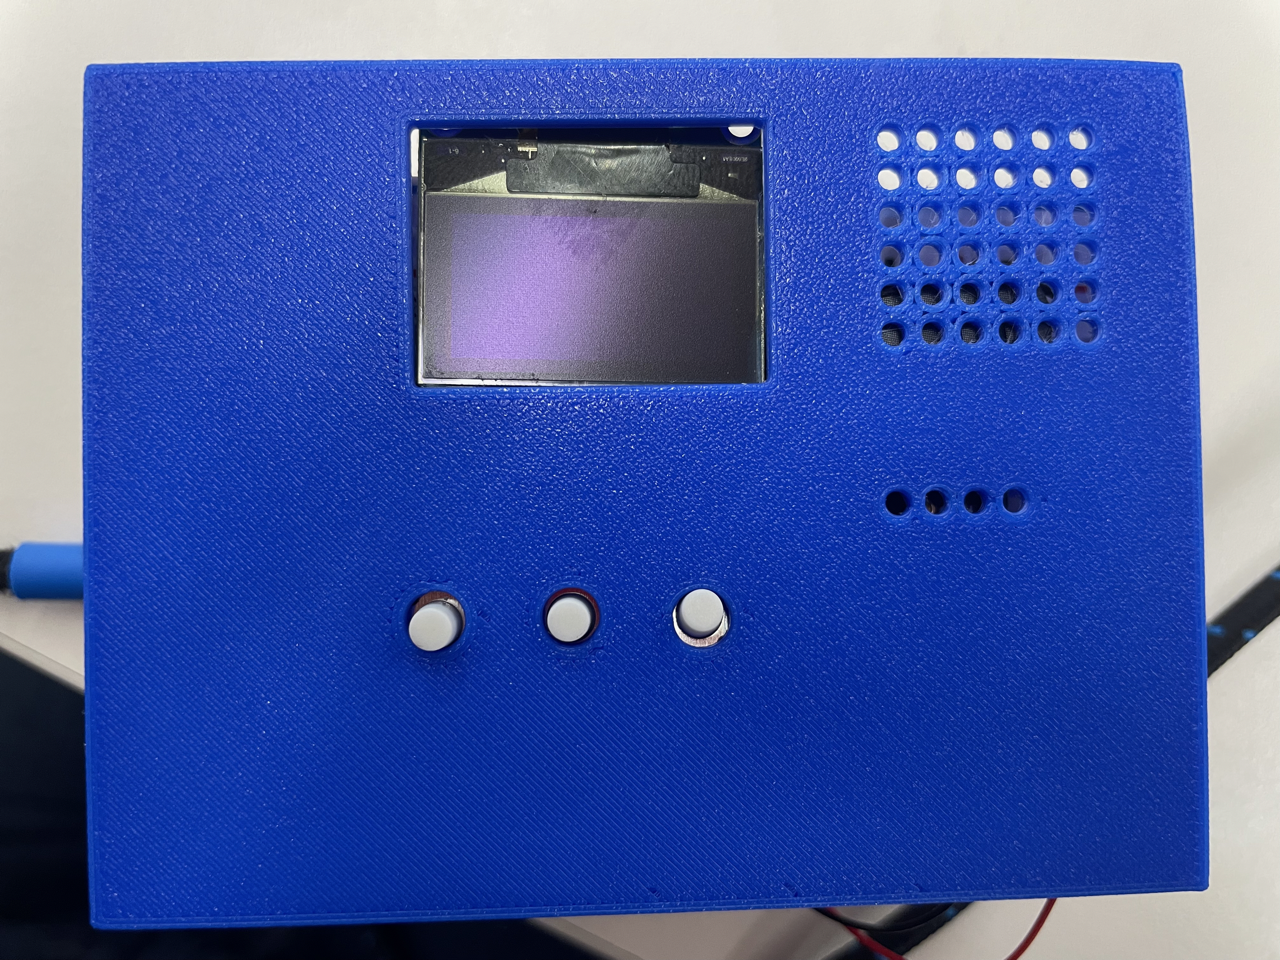
Final Product
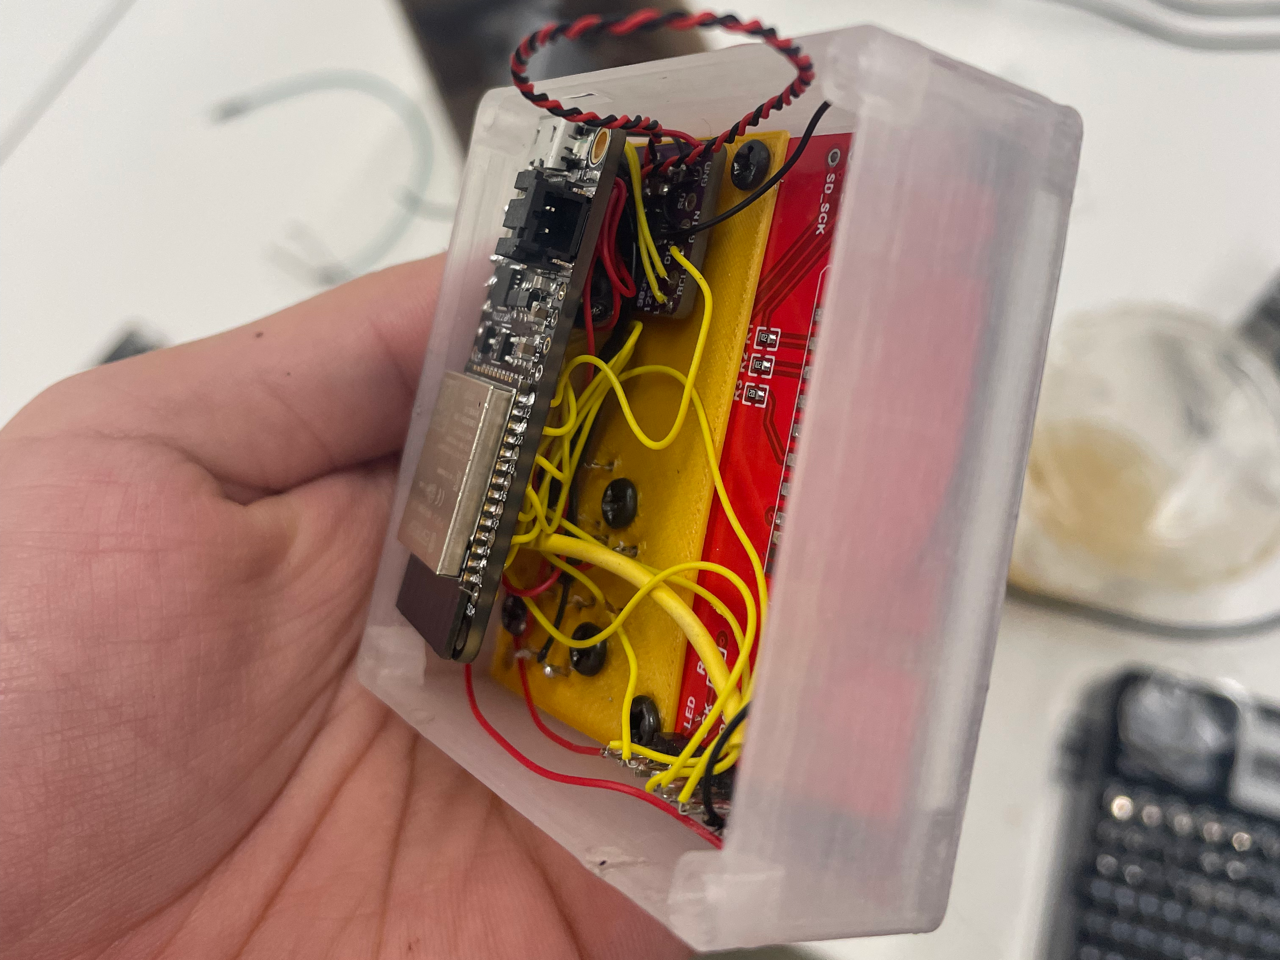
The frontface and backface were 3D printed using clear PLA, while the backplate was 3D printed using “Silk Gold” PLA. This was assembled and soldered manually by hand using 26 gauge copper wire. The prototype with unfinished cable management is shown below.
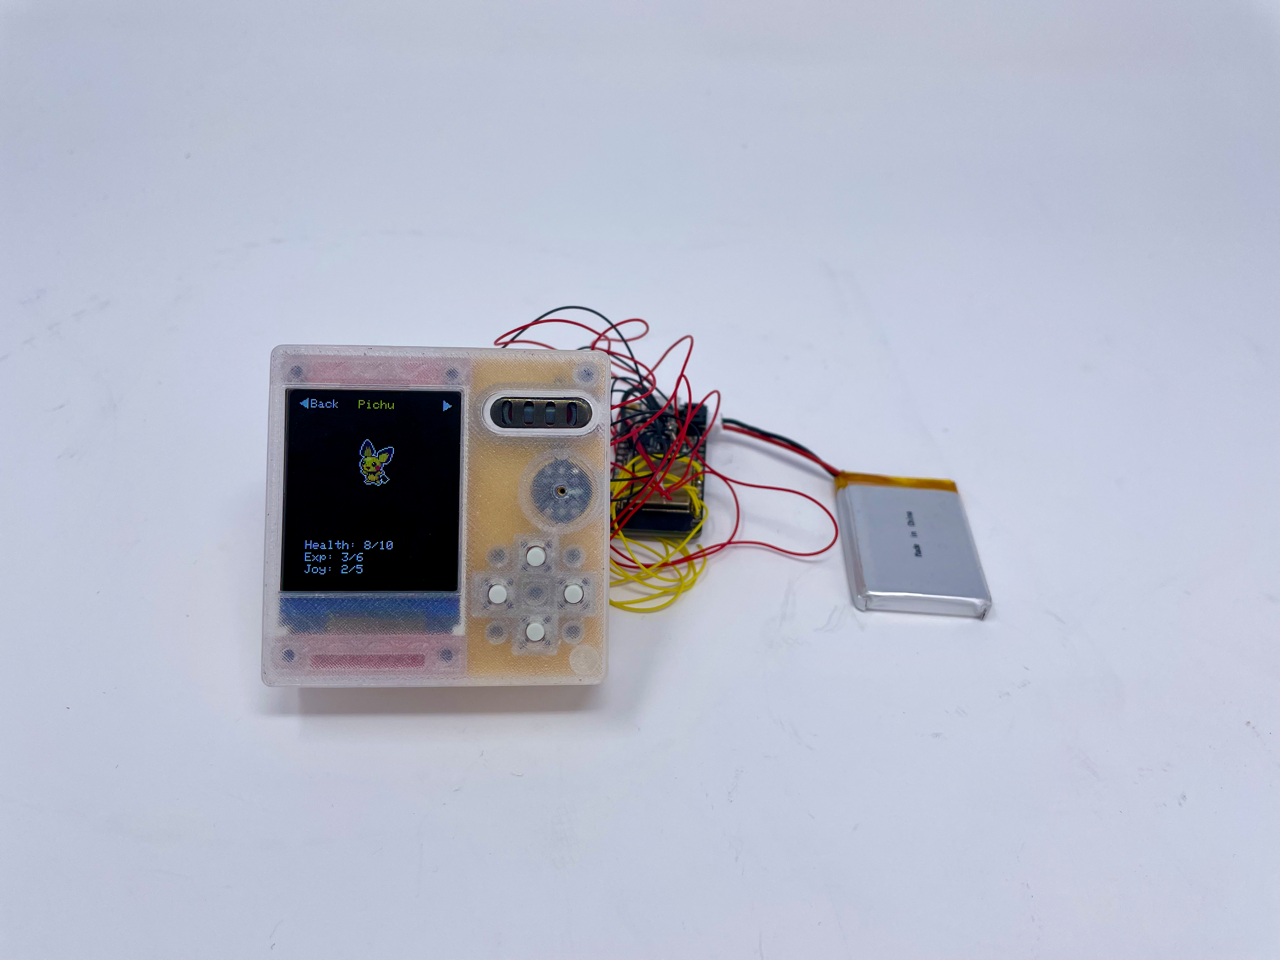
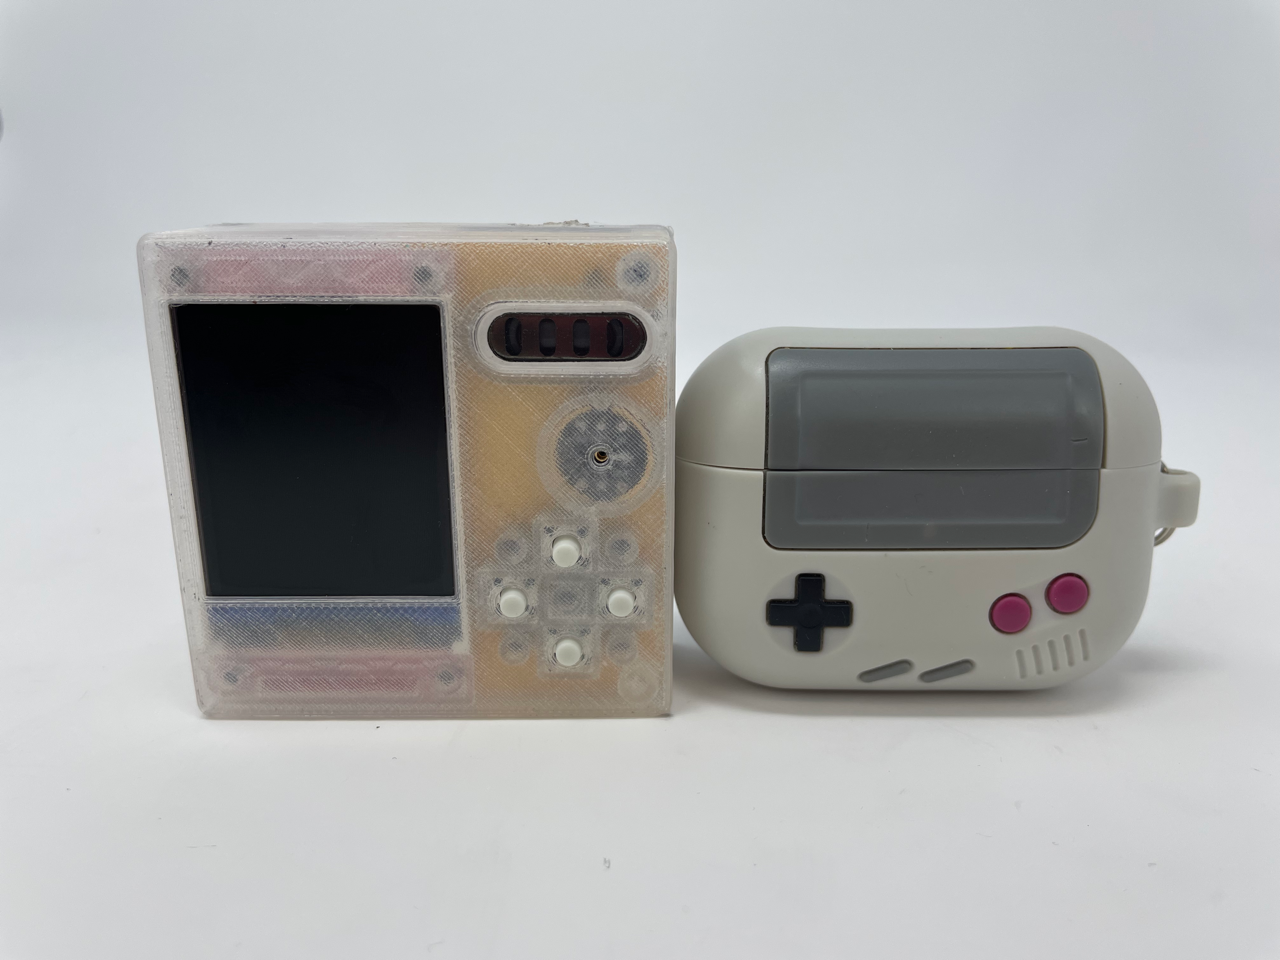
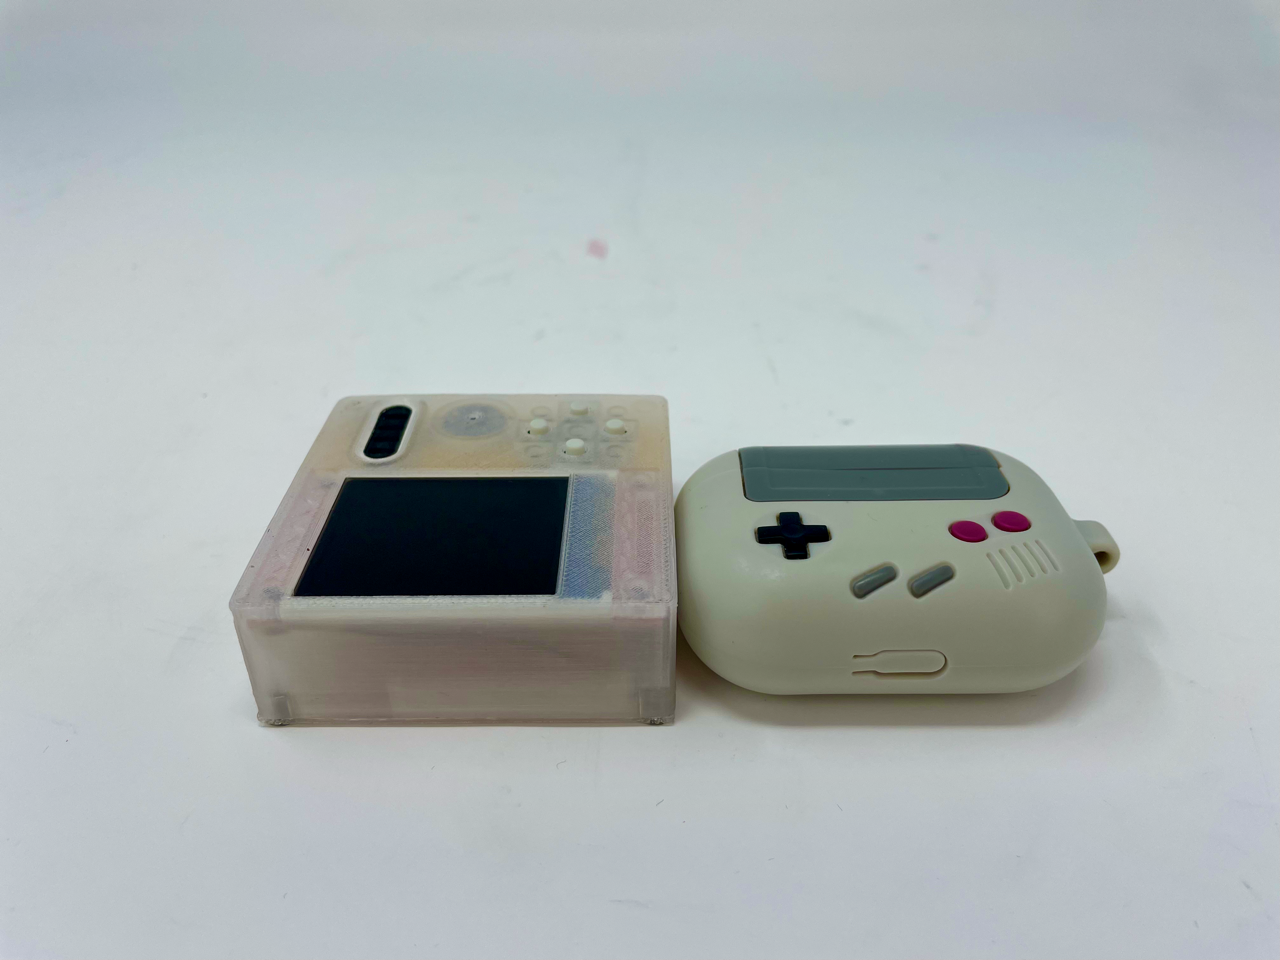
The final product after soldering and cable management is shown below and compared to an AirPods Pro case for size reference.
Electronic circuit
The electronic circuit design was relatively simple since each component can be connected directly into the ESP32.
| Component | ESP32 Pin |
|---|---|
| Screen | MOSI: 18, SCLK: 5, CS: 22, RST: 19, DC: 23 |
| Microphone | BCK: 27, WS: 33, DATA: 12 |
| Speaker | BCK: 15, WS: 14, Data: 32 |
| Buttons | R: 25, L: 4, U: 26, D:21 |
Software
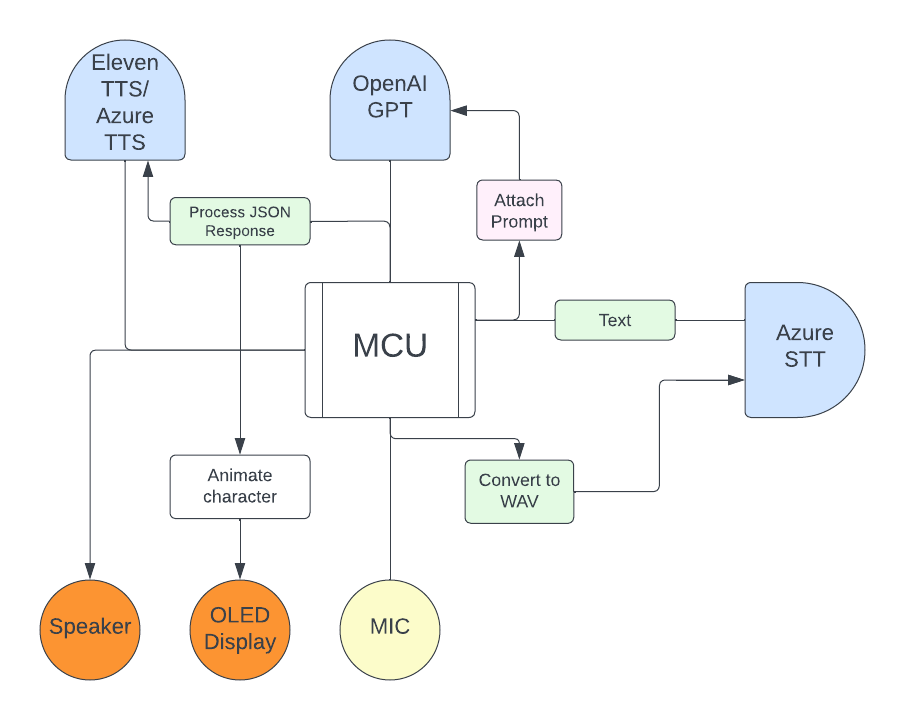
Here is a schematic of the software architecture of the project.
Microcontroller coding
The code for the microcontroller consists of three main parts.
- The GUI, which is implemented through conditional statements and a drawMenu() function that draws the menu based on the currentMenu and currentOption variables. The GUI is drawn using functions from the TFT_eSPI library.
- HTTP request to play audio from a URL. This is done through the HTTPClient library and the I2S library.
- Webserver to send microphone data to the webserver. This is done through Arduino-Audio-Tools library.
The Webserver audio data transmission runs on thread 0 while the rest of the code runs on thread 1. This ensures no audio data is loss while the GUI is being drawn, the speaker is running and the buttons are pressed. This is also necessary because in order for the server to start listening to the ESP32 Microphone data, a HTTP GET request needs to be sent to the sever. This GET request and the Microphone webserver needs to run at the same time. Therefore, my code only works on multi-threaded ESP32 devices such as the ESP32 and ESP32-S3 and will not work on single-threaded micro-controllers.
Server code (click here!)
#include <HTTPClient.h>
#include <ArduinoJson.h>
#include <SPI.h>
#include <TFT_eSPI.h>
#include <stdio.h>
#include "pikachu.h"
#include <Button.h>
TFT_eSPI tft = TFT_eSPI(); // Create a TFT_eSPI object
int currentMenu = 0; // Current selected menu
int currentOption = 0; // Current selected menu option
int currentMillis = 0;
int screenDrawn = 0;
const char* optionsInitial[] = {"MP3 Streamer", "Tamagochi", "AI Bot", "Settings", "Sleep"};// Menu 0
const char* optionsSettings[] = {"Volume"};// Menu 4
const int menuSizes[] = {5,0,0,0,1,0};
const int buttonRightPin = 25;
const int buttonLeftPin = 4;
const int buttonUpPin = 26;
const int buttonDownPin = 21;
int currentTamagochi = 0;
// short unsigned int *currentTamagochi = pichu;
Button buttonRight(buttonRightPin); // Power button object
Button buttonLeft(buttonLeftPin); // Up button object
Button buttonUp(buttonUpPin); // Down button object
Button buttonDown(buttonDownPin);
int FirstTime = 0;
#include "AudioTools.h"
AudioWAVServer server("MAKERSPACE", "12345678"); // the same a above
// AudioWAVServer server("xfinitywifi_HUH_Res", "huhwifi9434");
I2SStream i2sStream;
VolumeOutput mic_vol;
StreamCopy mic_copier(mic_vol, i2sStream); // Access I2S as stream
ConverterFillLeftAndRight<int16_t> filler(RightIsEmpty); // fill both channels - or change to RightIsEmpty
// Speaker Stream
#include "AudioCodecs/CodecMP3Helix.h"
URLStream url("MAKERSPACE", "12345678");
// URLStream url("xfinitywifi_HUH_Res", "huhwifi9434");
I2SStream i2s;
VolumeStream vol(i2s); // final output of decoded stream
EncodedAudioStream dec(&vol, new MP3DecoderHelix()); // Decoding stream
StreamCopy copier(dec, url); // copy url to decoder
TaskHandle_t Task1;
void setup() {
// put your setup code here, to run once:
Serial.begin(115200);
// pinMode(buttonLeft, INPUT_PULLUP);
// pinMode(buttonRight, INPUT_PULLUP);
// pinMode(buttonUp, INPUT_PULLUP);
// pinMode(buttonDown, INPUT_PULLUP);
buttonLeft.begin(); // Initialize the power button
buttonRight.begin(); // Initialize the up button
buttonDown.begin(); // Initialize the down button
buttonUp.begin(); // Initialize the OK button
tft.begin(); // Initialize the TFT display
// tft.invertDisplay(1);
// tft.setRotation(2); // Set the display rotation (if needed)
tft.fillScreen(TFT_BLACK); // Set the background color
// delay(1000);
AudioLogger::instance().begin(Serial, AudioLogger::Info);
// start i2s input with default configuration
Serial.println("starting I2S...");
auto mic_config = i2sStream.defaultConfig(RX_MODE);
mic_config.i2s_format = I2S_STD_FORMAT; // if quality is bad change to I2S_LSB_FORMAT https://github.com/pschatzmann/arduino-audio-tools/issues/23
mic_config.sample_rate = 16000;
mic_config.channels = 1;
mic_config.bits_per_sample = 16;
mic_config.is_master = true;
mic_config.port_no = 0;
mic_config.pin_data = 32;
mic_config.pin_bck = 15;
mic_config.pin_ws = 14;
i2sStream.begin(mic_config);
Serial.println("I2S started");
auto speaker_config = i2s.defaultConfig(TX_MODE);
speaker_config.i2s_format = I2S_STD_FORMAT;
speaker_config.pin_bck = 27;
speaker_config.pin_ws = 33;
speaker_config.pin_data = 12;
speaker_config.buffer_size = 512;
speaker_config.port_no = 1;
// start data sink
server.begin(i2sStream, mic_config, &filler);
// setup I2S based on sampling rate provided by decoder
i2s.begin(speaker_config);
dec.setNotifyAudioChange(i2s);
dec.begin();
// set volume
vol.begin(speaker_config); // we need to provide the bits_per_sample and channels
vol.setVolume(0.70);
esp_sleep_enable_ext0_wakeup(GPIO_NUM_4, 0); // Wakeup pin.
// Multithreading
xTaskCreatePinnedToCore(
Task1code, /* Function to implement the task */
"Task1", /* Name of the task */
10000, /* Stack size in words */
NULL, /* Task input parameter */
0, /* Priority of the task */
&Task1, /* Task handle. */
0); /* Core where the task should run */
}
void loop() {
// put your main code here, to run repeatedly:
if (currentMenu == 0){
drawMenu();
while(true){
if(buttonUp.pressed()){
if ( currentOption > 0 ){
Serial.println("buttonUp pressed");
currentOption--;
} else {
currentOption = getNumOptions(currentMenu) - 1;
}
drawMenu();
}
if (buttonDown.pressed()){
Serial.println("buttonDown pressed");
if (currentOption < getNumOptions(currentMenu) - 1){
currentOption++;
} else {
currentOption = 0;
}
drawMenu();
}
if(buttonRight.pressed()){
currentMenu = currentOption+1;
drawMenu();
Serial.println(currentMenu);
currentOption = 0;
break;
}
}
}
if (currentMenu == 1){
tft.fillScreen(TFT_BLACK);
tft.setCursor(20, 10);
tft.println("Streaming Radio");
tft.setCursor(60, 80);
tft.println("Press Right to Continue");
Serial.println("Menu Two");
while (true) {
if (buttonRight.pressed()){
url.begin("http://stream.srg-ssr.ch/m/rsj/mp3_128","audio/mp3");
while(true){
copier.copy();
if (buttonLeft.pressed()){
url.end();
break;
}
}
}
if (buttonLeft.pressed()){
currentMenu = 0;
drawMenu();
break;
}
}
}
if (currentMenu == 2){
tft.fillScreen(TFT_BLACK);
tft.setSwapBytes(true);
if(currentTamagochi == 0){
tft.pushImage(20, 10, 96, 96, pichu);
} else if (currentTamagochi == 1){
tft.pushImage(20, 10, 96, 96, pikachu);
} else if (currentTamagochi == 2){
tft.pushImage(20, 10, 76, 76, raichu);
}
tft.setCursor(10, 120);
tft.setTextColor(TFT_WHITE);
tft.println("Health: 8/10");
tft.setCursor(10, 130);
tft.println("Exp: 3/6");
tft.setCursor(10, 140);
tft.println("Joy: 2/5");
tft.fillTriangle(2,5,8,1,8,9,TFT_WHITE);
tft.fillTriangle(126,5,120,1,120,9,TFT_WHITE);
tft.setCursor(11, 2);
tft.print("Back");
tft.setCursor(50, 2);
tft.setTextColor(TFT_YELLOW);
tft.setTextSize(1.5);
tft.print("Pichu");
while (true) {
if (buttonLeft.pressed()){
currentMenu = 0;
drawMenu();
break;
}
if (buttonRight.pressed()){
if (currentTamagochi < 2){
currentTamagochi++;
}
break;
}
}
}
if (currentMenu == 3){
if (buttonRight.pressed()){
Serial.println("I2S started");
tft.fillScreen(TFT_BLACK); // Clear the screen
// Draw the menu options
tft.setTextSize(1);
tft.setTextColor(TFT_WHITE);
tft.setCursor(0, 0);
vTaskResume(Task1);
int startMillis = millis();
HTTPClient http;
http.setTimeout(100000);
http.begin("http://192.168.0.117:8000/audio_in");
http.setTimeout(100000);
http.setConnectTimeout(100000);
tft.println("Start speaking to me!");
int httpResponseCode = http.GET();
// Serial.println("Starting recognition");
int currentMillis = 0;
Serial.println(httpResponseCode);
String payload = http.getString();
DynamicJsonDocument doc(2048);
DeserializationError error = deserializeJson(doc, payload);
http.end();
tft.println("Recorded!");
vTaskSuspend(Task1);
tft.setCursor(10, 30);
tft.println(doc["text"].as<String>());
Serial.println(doc["text"].as<String>());
tft.setCursor(10, 40);
tft.println(doc["gpt"].as<String>());
Serial.println(doc["text"].as<String>());
delay(500);
if(httpResponseCode == 200){
url.begin("http://192.168.0.117:8000/audio_out","audio/mp3");
}
// currentMillis = 0;
while (true){
copier.copy();
if(buttonLeft.pressed()){
currentMenu = 0;
// drawMenu();
break;
}
}
Serial.print("Done!");
url.end();
drawMenu();
}
if(buttonLeft.pressed()){
currentMenu = 0;
drawMenu();
}
}
if (currentMenu == 4){
currentOption = 0;
drawMenu();
if (currentOption == 1){
while(true){
if(buttonUp.pressed()){
if ( currentOption > 0 ){
Serial.println("buttonUp pressed");
currentOption--;
} else {
currentOption = getNumOptions(currentMenu) - 1;
}
drawMenu();
}
if (buttonDown.pressed()){
Serial.println("buttonDown pressed");
if (currentOption < getNumOptions(currentMenu) - 1){
currentOption++;
} else {
currentOption = 0;
}
drawMenu();
}
if(buttonRight.pressed()){
currentMenu = currentOption+1;
drawMenu();
Serial.println(currentMenu);
currentOption = 0;
break;
}
}
}
}
if (currentMenu == 5){
if (buttonRight.pressed()){
tft.fillScreen(TFT_BLACK);
esp_deep_sleep_start();
}
if(buttonLeft.pressed()){
currentMenu = 0;
drawMenu();
}
}
}
void Task1code( void * pvParameters ){
Serial.print("Task1 running on core ");
Serial.println(xPortGetCoreID());
for(;;){
server.copy();
// Serial.print("Sending audio");
}
}
void drawMenu() {
tft.fillScreen(TFT_BLACK); // Clear the screen
// Draw the menu options
tft.setTextSize(1);
tft.setTextColor(TFT_WHITE);
if (currentMenu == 0) {
tft.setCursor(5, 5);
tft.println("Select Program");
tft.fillTriangle(2,155,8,151,8,159,TFT_WHITE); // Bottom Left Arrow
tft.setCursor(80, 152);
tft.println("Select");
tft.fillTriangle(126,155,120,151,120,159,TFT_WHITE);
}
else if (currentMenu == 1) {
tft.setCursor(5, 5);
tft.println("Press Button to Play Music");
}
else if (currentMenu == 2) {
tft.setCursor(5, 5);
tft.println("Press Button to see Tamagochi");
}
else if (currentMenu == 3) {
tft.setCursor(5, 5);
tft.println("Press Button to see talk to your Tamagochi");
}
else if (currentMenu == 4) {
tft.setCursor(5, 5);
tft.println("Settings");
}
else if (currentMenu == 5) {
tft.setCursor(5, 5);
tft.println("Press > to go to sleep");
}
if (currentMenu == 0) {
for (int i = 0; i < getNumOptions(currentMenu); i++) {
if (i == currentOption) {
tft.setTextColor(TFT_YELLOW); // Highlight the selected option
} else {
tft.setTextColor(TFT_WHITE);
}
tft.setCursor(10, 30 + i * 20);
tft.println(optionsInitial[i]);
}
}
// Settings
if (currentMenu == 4) {
for (int i = 0; i < getNumOptions(currentMenu); i++) {
if (i == currentOption) {
tft.setTextColor(TFT_YELLOW); // Highlight the selected option
} else {
tft.setTextColor(TFT_WHITE);
}
tft.setCursor(10, 30 + i * 20);
tft.println(optionsSettings[i]);
}
}
}
int getNumOptions(int menu) {
return (int) menuSizes[menu];
}
Server
The server has three main functions:
- First, it processes the microphone data that is send by the ESP32 to text.
- It then sends the text to OpenAI GPT-3.5 API to get a response.
- It sends the response to Microsoft TTS server which returns an audio file of the GPT response and streams it to the ESP32.
This is all done when a GET request is made by the ESP32 to /audio_in/, which returns the ChatGPT response in plaintext. Another GET request is made after the ESP32 receives the response to /audio_out/, which streams an MP3 audio file of the response to the ESP32. The code below also has an MP3 player API which can be used to stream MP3 files to the tamagotchi.
Microcontroller Code (click here)
```python
from pathlib import Path
from fastapi import FastAPI, File, UploadFile, HTTPException, Depends, BackgroundTasks
from fastapi import Request, Response
from fastapi.responses import StreamingResponse
from fastapi import Header
from pydantic import BaseModel
from azure.cognitiveservices.speech.audio import AudioOutputStream
import io
import aiofiles

import requests
import pyaudio
import azure.cognitiveservices.speech as speechsdk
import os
import asyncio
import threading
from langchain.callbacks.base import CallbackManager
from langchain.callbacks.streaming_stdout import StreamingStdOutCallbackHandler
from langchain.chat_models import ChatOpenAI
from langchain.schema import (
    HumanMessage,
)
import time
from langchain.llms import OpenAI

app = FastAPI()
CHUNK_SIZE = 2048
video_path = Path("creep.mp3")
SERVER_ADDRESS = "http://192.168.0.248"
url = f"{SERVER_ADDRESS}"
speech_config = speechsdk.SpeechConfig(
    subscription=os.environ.get("SPEECH_KEY"),
    region=os.environ.get("SPEECH_REGION"),
)

chat = ChatOpenAI(
    verbose=True,
    temperature=0,
)
llm = OpenAI(temperature=0.9)


async def generate_audio_stream(text: str):

    compressed_format = speechsdk.audio.AudioStreamFormat(
        compressed_stream_format=speechsdk.AudioStreamContainerFormat.MP3
    )
    pull_stream = speechsdk.audio.PullAudioOutputStream()
    # Creates a speech synthesizer using pull stream as audio output.
    stream_config = speechsdk.audio.AudioOutputConfig(stream=pull_stream)
    speech_synthesizer = speechsdk.SpeechSynthesizer(
        speech_config=speech_config, audio_config=stream_config
    )

    result = speech_synthesizer.speak_text_async(text).get()

    if result.reason == speechsdk.ResultReason.SynthesizingAudioCompleted:

        def audio_stream_generator():
            while True:
                audio_chunk = pull_stream.read(1024)
                if not audio_chunk:
                    break
                yield audio_chunk

        return Response(audio_stream_generator(), media_type="audio/wav")
    else:
        return {"error": "TTS failed", "details": result.error_details}


async def speech_synthesis_to_mp3_file(text):
    """performs speech synthesis to a mp3 file"""
    # Creates an instance of a speech config with specified subscription key and service region.
    # Sets the synthesis output format.
    # The full list of supported format can be found here:
    # https://docs.microsoft.com/azure/cognitive-services/speech-service/rest-text-to-speech#audio-outputs
    speech_config.set_speech_synthesis_output_format(
        speechsdk.SpeechSynthesisOutputFormat.Audio16Khz32KBitRateMonoMp3
    )
    # Creates a speech synthesizer using file as audio output.
    # Replace with your own audio file name.
    file_name = "outputaudio.mp3"
    file_config = speechsdk.audio.AudioOutputConfig(filename=file_name)
    speech_synthesizer = speechsdk.SpeechSynthesizer(
        speech_config=speech_config, audio_config=file_config
    )

    # Receives a text from console input and synthesizes it to mp3 file.
    result = speech_synthesizer.speak_text_async(text).get()
    # Check result
    if result.reason == speechsdk.ResultReason.SynthesizingAudioCompleted:
        print(
            "Speech synthesized for text [{}], and the audio was saved to [{}]".format(
                text, file_name
            )
        )
    elif result.reason == speechsdk.ResultReason.Canceled:
        cancellation_details = result.cancellation_details
        print("Speech synthesis canceled: {}".format(cancellation_details.reason))
        if cancellation_details.reason == speechsdk.CancellationReason.Error:
            print("Error details: {}".format(cancellation_details.error_details))


async def preload_audio(text: str):
    await speech_synthesis_to_mp3_file(text)


async def send_to_gpt(text: str):
    await chat([HumanMessage(content=text)])


@app.get("/tts")
async def text_to_speech(text: str):
    return await generate_audio_stream(text)


class ChatMessage(BaseModel):
    message: str


@app.post("/upload/")
async def upload_file(file: UploadFile = File(...)):
    if file.filename.endswith(".mp3"):
        return {"filename": file.filename}
    else:
        raise HTTPException(status_code=400, detail="File must be in MP3 format")


@app.post("/uploadandplay/")
async def upload_file(file: UploadFile = File(...)):
    if file.filename.endswith(".mp3"):
        return {"filename": file.filename}
    else:
        raise HTTPException(status_code=400, detail="File must be in MP3 format")


async def file_streamer(filename: str):
    try:
        async with aiofiles.open(filename, mode="rb") as f:
            while True:
                chunk = await f.read(1024)
                if not chunk:
                    break
                yield chunk
    except FileNotFoundError:
        raise HTTPException(status_code=404, detail="File not found")


@app.get("/stream/{filename}")
async def stream_audio(filename: str):
    def iterfile():
        with open(filename, mode="rb") as f:
            while chunk := f.read(CHUNK_SIZE):
                yield chunk
            # yield from file_like

    return StreamingResponse(iterfile(), media_type="audio/mpeg")


async def speech_recognition_with_push_stream():
    """gives an example how to use a push audio stream to recognize speech from a custom audio
    source"""
    CHUNK = 1024

    def push_stream_writer(url, stream, recognition_done):
        try:
            with requests.get(url, stream=True) as response:
                response.raise_for_status()
                for chunk in response.iter_content(chunk_size=CHUNK):
                    if (
                        recognition_done.is_set()
                    ):  # Check if the recognition_done event is set
                        break
                    stream.write(chunk)
                stream.close()
        finally:
            stream.close()

    speech_config = speechsdk.SpeechConfig(
        subscription=os.environ.get("SPEECH_KEY"),
        region=os.environ.get("SPEECH_REGION"),
    )
    # setup the audio stream
    stream = speechsdk.audio.PushAudioInputStream()
    audio_config = speechsdk.audio.AudioConfig(stream=stream)
    # instantiate the speech recognizer with push stream input
    speech_recognizer = speechsdk.SpeechRecognizer(
        speech_config=speech_config, audio_config=audio_config
    )
    recognition_done = threading.Event()

    # # Connect callbacks to the events fired by the speech recognizer
    def session_stopped_cb(evt):
        """callback that signals to stop continuous recognition upon receiving an event `evt`"""
        print("SESSION STOPPED: {}".format(evt))
        recognition_done.set()

    speech_recognizer.recognized.connect(
        lambda evt: print("RECOGNIZED: {}".format(evt))
    )
    speech_recognizer.session_started.connect(
        lambda evt: print("SESSION STARTED: {}".format(evt))
    )
    speech_recognizer.session_stopped.connect(session_stopped_cb)
    # start push stream writer thread
    push_stream_writer_thread = threading.Thread(
        target=push_stream_writer, args=[url, stream, recognition_done]
    )

    push_stream_writer_thread.start()
    print("Recognizing speech:")
    result_future = speech_recognizer.recognize_once_async()
    result = result_future.get()
    if result.reason == speechsdk.ResultReason.RecognizedSpeech:
        print("Recognized: {}".format(result.text))
    print("Done recognizing")
    push_stream_writer_thread.join()
    print("Finished")
    return result


class TestResponse:
    text = "Give me a 10 word idea!"


async def send_to_gpt(text: str):
    return llm.generate(["Keep answer to less than 20 words: " + text])


@app.get("/audio_in")
async def read_audio(background_tasks: BackgroundTasks):
    try:
        result = await speech_recognition_with_push_stream()
        resp = await send_to_gpt(result.text)
        background_tasks.add_task(preload_audio, resp.generations[0][0].text)
        print(resp.generations[0][0].text)
        return {"text": result.text, "gpt": resp.generations[0][0].text}

    except Exception as e:
        raise HTTPException(status_code=500, detail=str(e))


@app.get("/audio_out")
async def stream_audio():
    return StreamingResponse(file_streamer("outputaudio.mp3"), media_type="audio/mpeg")


@app.get("/test_read")
async def read_audio():
    return {"status": "success", "message": "Hello!"}
Extensions
In the next version of the design, here are a few changes I would make
- Reduce space and make the edges curved (similar to the Airpods/Tamagochi case)
- Design a PCB to hold all the components together and make the design more compact
- Use surface-mount devices instead of stock components.
- Add a BMP280 so the AI can see altitude and temperature information. One of the most asked questions was “what is the weather like today”, which it currently cannot answer accurately.
- Bluetooth to piggy back off phone connectivity (?)
CAD Files
Download my Fusion360 CAD file here Download the final STL file here